Chapter 4. Tuning Practice - Asset
Game production involves handling a large number of different types of assets such as textures, meshes, animations, and sounds.This chapter provides practical knowledge about these assets, including settings to keep in mind when tuning performance.
4.1. Texture
Image data, which is the source of textures, is an indispensable part of game production.On the other hand, it consumes a relatively large amount of memory, so it must be configured appropriately.
4.1.1. Import Settings
Figure 4.1 is the import settings for textures in Unity.
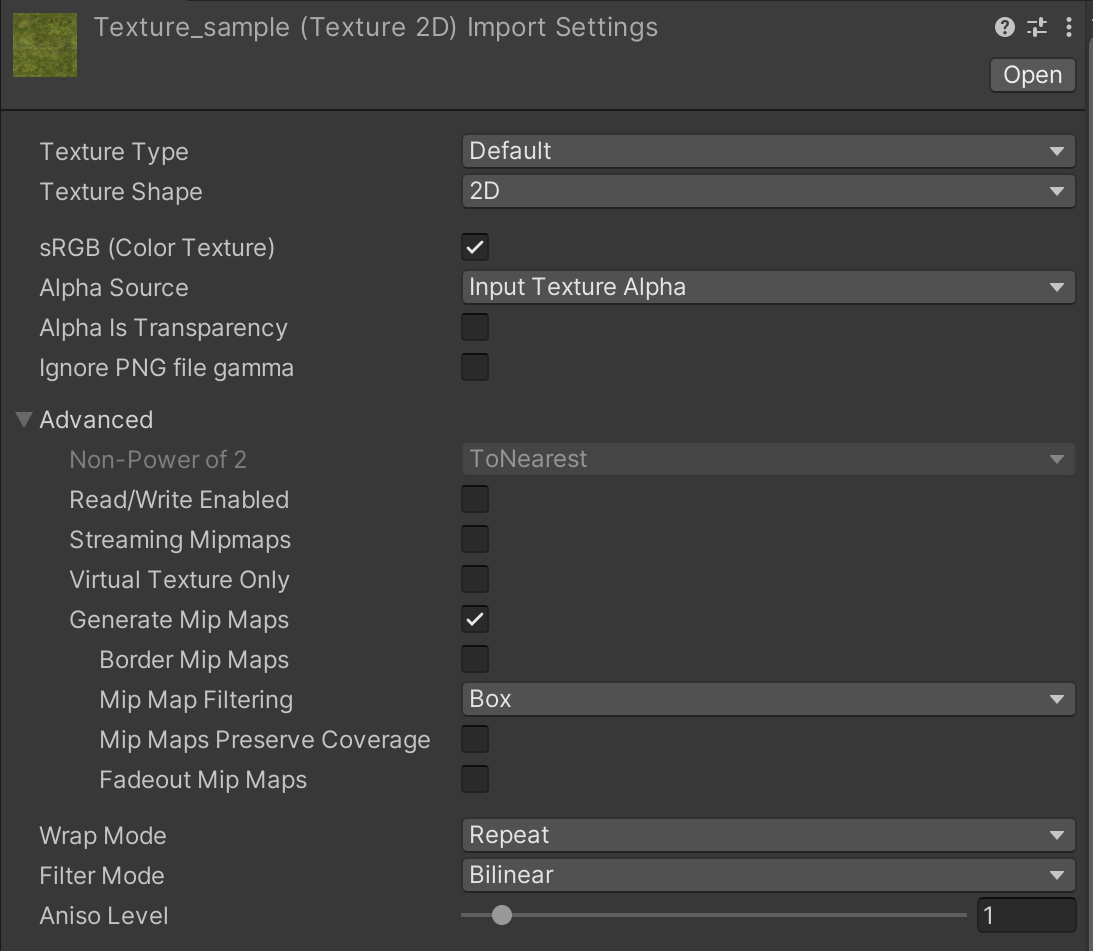
Figure 4.1: Texture Settings
Here are some of the most important ones to keep in mind.
4.1.2. Read/Write
This option is disabled by default. If disabled, textures are only expanded in GPU memory.If enabled, it will be copied not only to GPU memory but also to main memory, thus doubling the consumption.Therefore, if you do not use APIs such as Texture.GetPixel or Texture.SetPixel and only use Shader to access textures, be sure to disable them.
Also, for textures generated at runtime, set makeNoLongerReadable to true as shown at List 4.1 to avoid copying to main memory.
List 4.1: Setting makeNoLongerReadable
texture2D.Apply(updateMipmaps, makeNoLongerReadable: true) |
Since transferring textures from GPU memory to main memory is time-consuming, performance is improved by deploying textures to both if they are readable.
4.1.3. Generate Mip Maps
Enabling the Mip Map setting increases texture memory usage by about 1.3 times.This setting is generally used for 3D objects to reduce jaggies and texture transfer for distant objects.It is basically unnecessary for 2D sprites and UI images, so it should be disabled.
4.1.4. Aniso Level
Aniso Level is a function to render textures without blurring when objects are rendered at shallow angles.This function is mainly used for objects that extend far, such as the ground or floor.The higher the Aniso Level value, the more benefit it provides, but at a higher processing cost.

Figure 4.2: Aniso Level adaptation image
The Aniso Level can be set from 0 to 16, but it has a slightly special specification.
- 0: Always disabled regardless of project settings
- 1: Basically disabled. However, if the project setting is Forced On, the value is clamped to 9~16.
- Otherwise: Set at that value
When textures are imported, the value is 1 by default.Therefore, the Forced On setting is not recommended unless you are targeting a high-spec device.Forced On can be set from "Anisotropic Textures" in "Project Settings -> Quality".

Figure 4.3: Forced On Settings
Make sure that the Aniso Level setting is not enabled for objects that have no effect, or that it is not set too high for objects that do have an effect.
The effect of Aniso Level is not linear, but rather switches in steps.The author verified that it changes in four steps: 0~1, 2-3, 4~7, and 8 or later.
4.1.5. Compression Settings
Textures should be compressed unless there is a specific reason not to.If you find uncompressed textures in your project, it may be human error or lack of regulation. Check it out as soon as possible.More information on compression settings can be found at "2.3.3 Image Compression".
We recommend using TextureImporter to automate these compression settings to avoid human error.
List 4.2: Example of TextureImporter automation
using UnityEditor; public class ImporterExample : AssetPostprocessor { private void OnPreprocessTexture() { var importer = assetImporter as TextureImporter; // Read/Write settings, etc. are also possible. importer.isReadable = false; var settings = new TextureImporterPlatformSettings(); // Specify Android = "Android", PC = "Standalone settings.name = "iPhone"; settings.overridden = true; settings.textureCompression = TextureImporterCompression.Compressed; // Specify compression format settings.format = TextureImporterFormat.ASTC_6x6; importer.SetPlatformTextureSettings(settings); } } |
Not all textures need to be in the same compression format.For example, among UI images, images with overall gradations tend to show a noticeable quality loss due to compression.In such cases, it is recommended to set a lower compression ratio for only some of the target images.On the other hand, for textures such as 3D models, it is difficult to see the quality loss, so it is best to find an appropriate setting such as a high compression ratio.
4.2. Mesh
The following are points to keep in mind when dealing with mesh (models) imported into Unity. Performance of imported model data can be improved depending on the settings. The following four points should be noted.
- Read/Write Enabled
- Vertex Compression
- Mesh Compression
- Optimize Mesh Data
4.2.1. Read/Write Enabled
The first mesh note is Read/Write Enabled.This option in the model inspector is disabled by default.
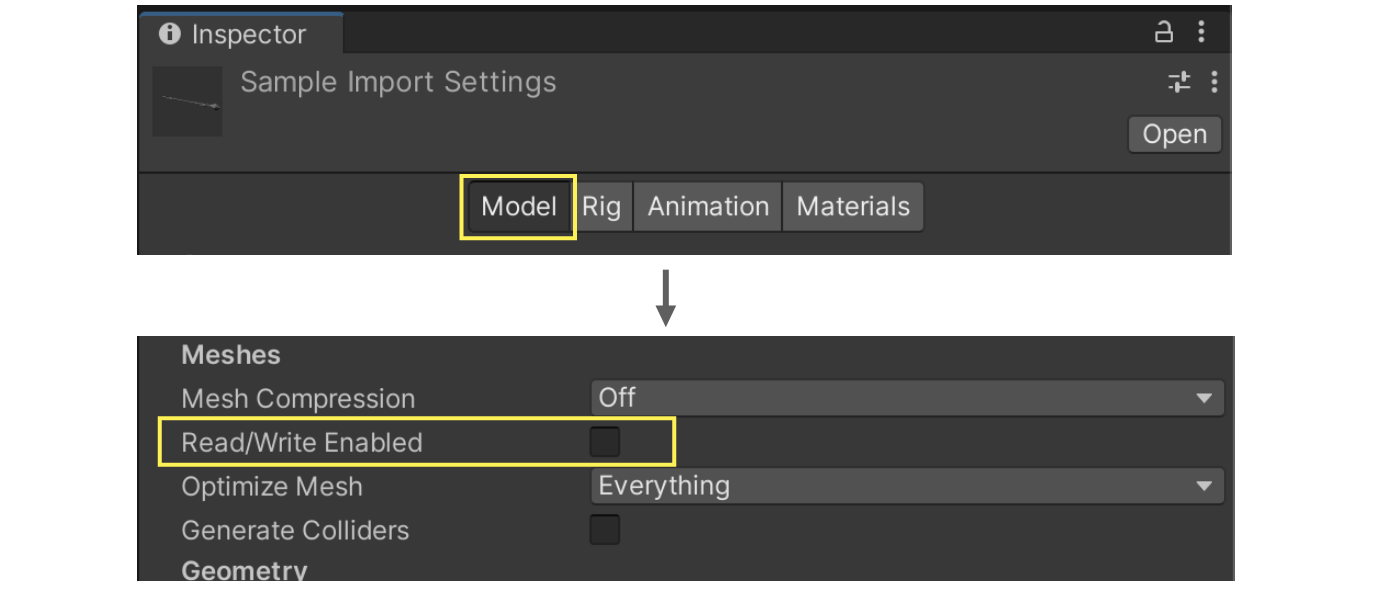
Figure 4.4: Read/Write Settings
If you do not need to access the mesh during runtime, you should disable it. Specifically, if the model is placed on Unity and used only to play an AnimationClip, Read/Write Enabled is fine to disable.
Enabling Read/Write Enabled will consume twice as much memory because information accessible by the CPU is stored in memory. Please check it out, as simply disabling it will save memory.
4.2.2. Vertex Compression
Vertex Compression is an option that changes the precision of mesh vertex information from float to half.This can reduce memory usage and file size at runtime.The default setting is as follows.
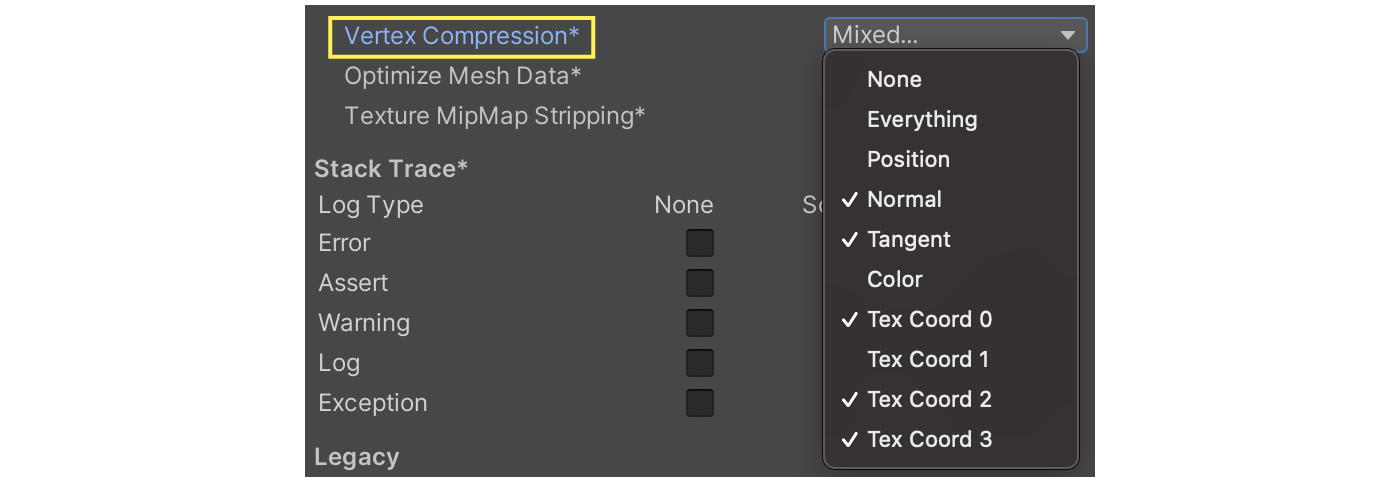
Figure 4.5: Default settings for Vertex Compression
However, please note that Vertex Compression is disabled under the following conditions
- Read/Write is enabled
- Mesh Compression is enabled
- Mesh with Dynamic Batching enabled and adaptable (less than 300 vertices and less than 900 vertex attributes)
4.2.3. Mesh Compression
Mesh Compression allows you to change the compression ratio of the mesh. The higher the compression ratio, the smaller the file size and the less storage space is required.Compressed data is decompressed at runtime. Therefore, memory usage at runtime is not affected.
Mesh Compresssion offers four compression settings.
- Off: Uncompressed
- Low: Low compression
- Medium: Medium compression
- High: High compression
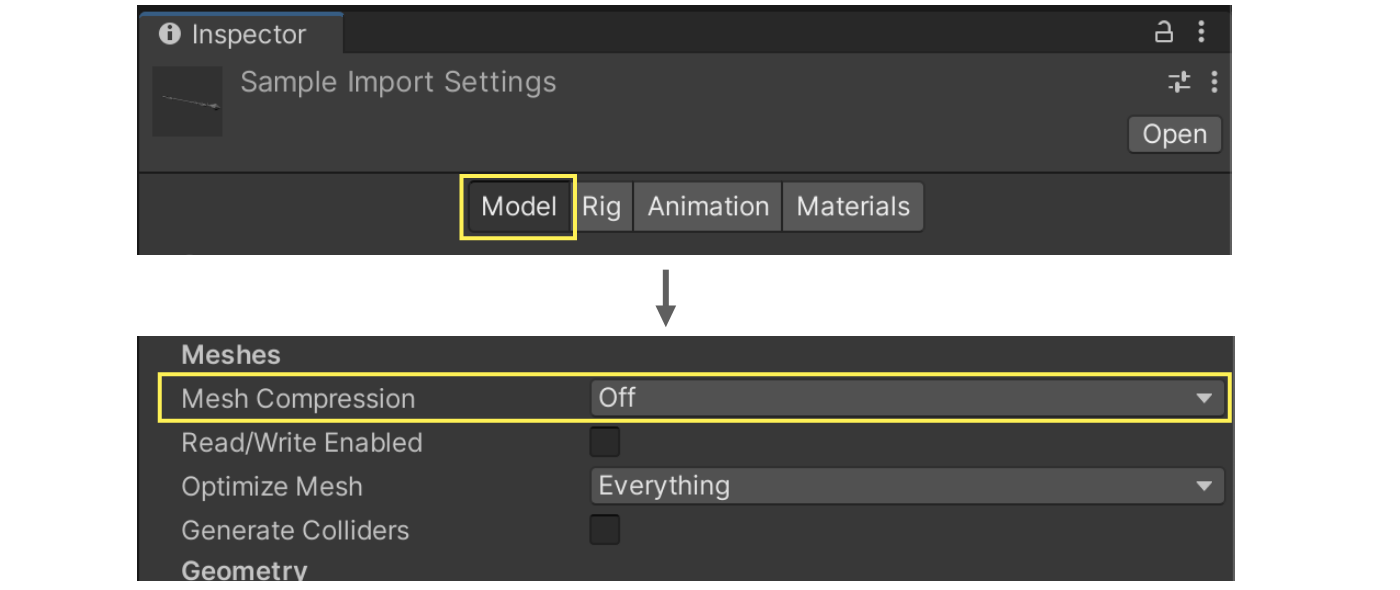
Figure 4.6: Mesh Compression
As mentioned in "4.2.2 Vertex Compression", enabling this option disables Vertex Compression.Especially for projects with strict memory usage limitations, please be aware of this disadvantage before setting this option.
4.2.4. Optimize Mesh Data
Optimize Mesh Data is a function that automatically deletes unnecessary vertex data from the mesh.Unnecessary vertex data is automatically determined based on the shader used.This has the effect of reducing both memory and storage at runtime.The setting can be configured in "Other" under "Project Settings -> Player".

Figure 4.7: Optimize Mesh Data setting
This option is useful because it automatically deletes vertex data, but be aware that it may cause unexpected problems.For example, when switching between Material and Shader at runtime, the properties accessed may be deleted, resulting in incorrect rendering results.When bundling only Mesh assets, the incorrect Material settings may result in unnecessary vertex data.This is common in cases where only a mesh reference is provided, such as in the Particle System.
4.3. Material
Material is an important function that determines how an object is rendered.Although it is a familiar feature, it can easily cause memory leaks if used incorrectly.In this section, we will show you how to use materials safely.
Simply accessing a parameter will duplicate it.
The most important thing to remember about materials is that they can be duplicated simply by accessing their parameters. And it is hard to notice that it is being duplicated.
Take a look at the following code
List 4.3: Example of Material being duplicated
Material material; void Awake() { material = renderer.material; material.color = Color.green; } |
This is a simple process of setting the material's color property to Color.green. The renderer's material is duplicated. And the duplicated object must be explicitly Destroyed.
List 4.4: Example of deleting a duplicated Material
Material material; void Awake() { material = renderer.material; material.color = Color.green; } void OnDestroy() { if (material != null) { Destroy(material) } } |
Destroying a duplicated material in this way avoids memory leaks.
Let's thoroughly clean up generated materials.
Dynamically generated materials are another common cause of memory leaks. Make sure to Destroy generated materials when you are done using them.
Take a look at the following sample code.
List 4.5: Example of deleting a dynamically generated material
Material material; void Awake() { material = new Material(); // Dynamically generated material } void OnDestroy() { if (material != null) { Destroy(material); // Destroying a material when you have finished using it } } |
Materials should be destroyed when they are finished being used (OnDestroy). Destroy materials at the appropriate timing according to the rules and specifications of the project.
4.4. Animation
Animation is a widely used asset in both 2D and 3D.This section introduces practices related to animation clips and animators.
4.4.1. Adjusting the number of skin weights
Internally, motion updates the position of each vertex by calculating how much of each bone is affected by each vertex.The number of bones taken into account in the position calculation is called the skinweight or influence count.Therefore, the load can be reduced by adjusting the number of skin weights.However, reducing the number of skin weights may result in a strange appearance, so be sure to verify this when adjusting the number of skin weights.
The number of skin weights can be set from "Other" under "Project Settings -> Quality.
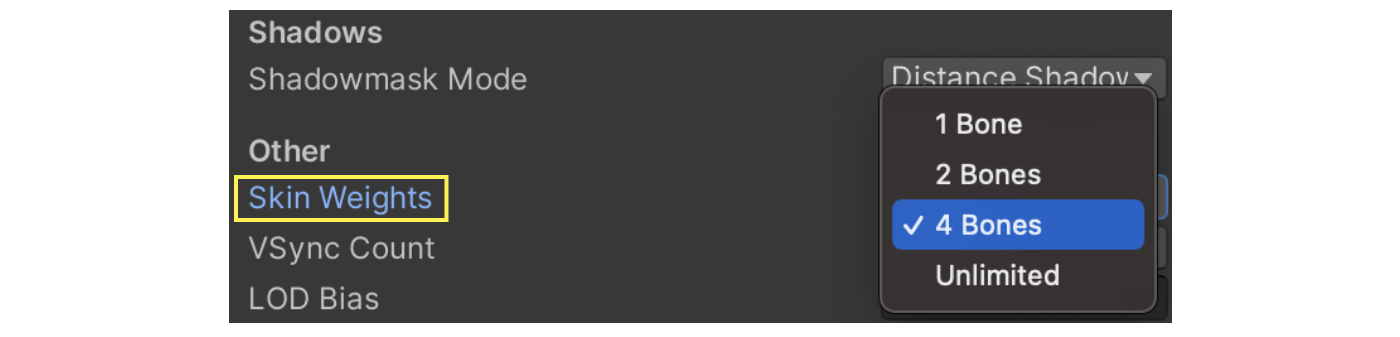
Figure 4.8: Adjusting Skin Weight
This setting can also be adjusted dynamically from a script.Therefore, it is possible to set Skin Weights to 2 for low-spec devices and 4 for high-spec devices, and so on, for fine-tuning.
List 4.6: Changing SkinWeight settings
// How to switch QualitySettings entirely // The argument number is the order of the QualitySettings, starting with 0. QualitySettings.SetQualityLevel(0); // How to change only SkinWeights QualitySettings.skinWeights = SkinWeights.TwoBones; |
4.4.2. Reducing Keys
Animation files are dependent on the number of keys, which can be a drain on storage and memory at run-time.One way to reduce the number of keys is to use the Anim. Compression feature.This option can be found by selecting the Animation tab from the model import settings.When Anim. Compression is enabled, unnecessary keys are automatically removed during asset import.
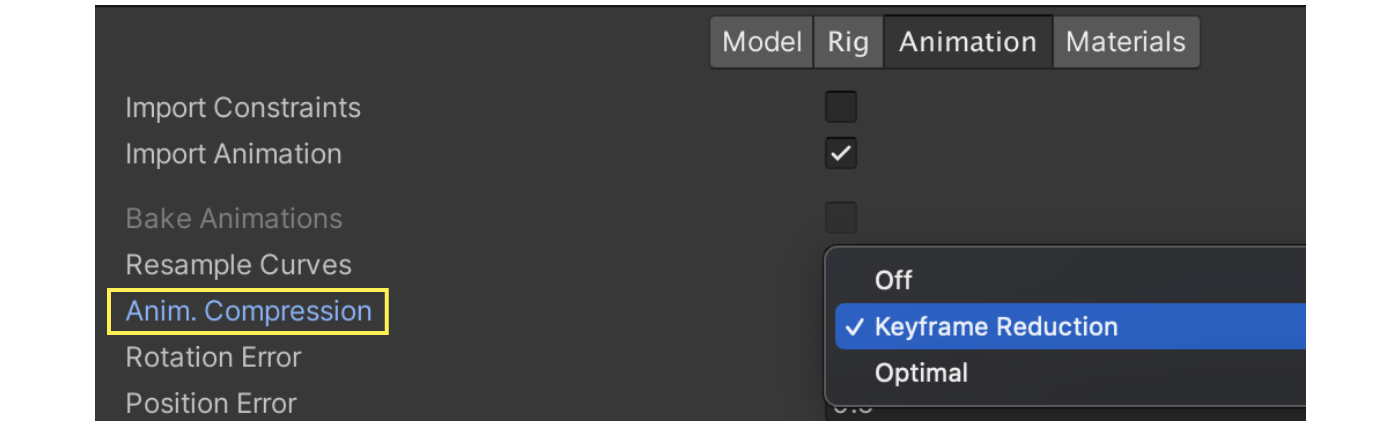
Figure 4.9: Anim. Compression settings screen
Keyframe Reduction reduces keys when there is little change in value.Specifically, keys are removed when they are within the Error range compared to the previous curve.This error range can be adjusted.

Figure 4.10: Error Settings
The Error settings are a bit complicated, but the units of the Error settings differ depending on the item.Rotation is in degrees, while Position and Scale are in percent.The tolerance for a captured image is 0.5 degrees for Rotation, and 0.5% for Position and Scale.The detailed algorithm can be found in the Unity documentation at *1, so please take a peek if you are interested.
Optimal is even more confusing, but it compares two reduction methods, the Dense Curve format and Keyframe Reduction, and uses the one with the smaller data.The key point to keep in mind is that Dense Curve is smaller in size than Keyframe Reduction.However, it tends to be noisy, which may degrade the animation quality.After understanding this characteristic, let's visually check the actual animation to see if it is acceptable.
4.4.3. Reduction of update frequency
By default, Animator updates every frame even if the animation is not on screen.There is an option called Culling Mode that allows you to change this update method.
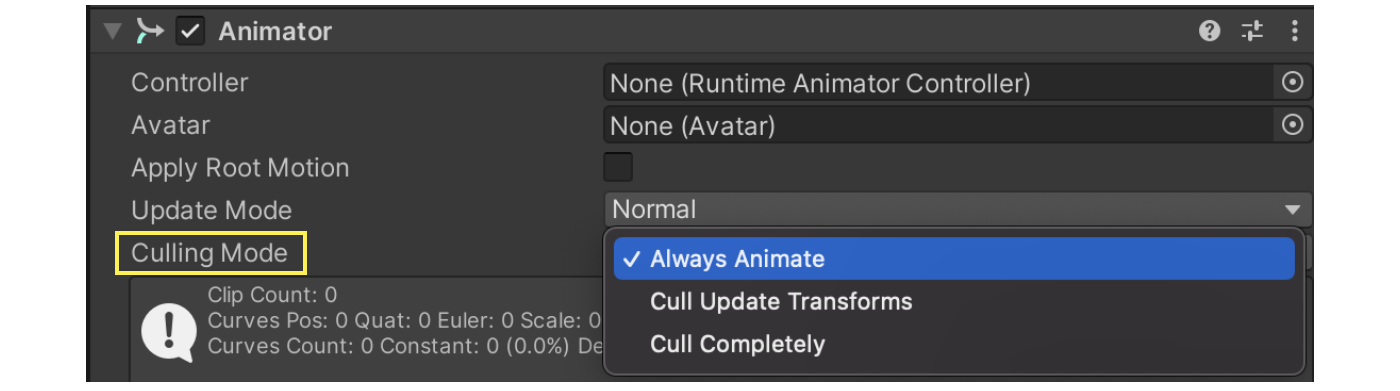
Figure 4.11: Culling Mode
The meaning of each option is as follows
Table 4.1: Description of culling mode
| Type | Meaning |
|---|---|
| Always Animate | Always update even when off-screen. (Default setting) |
| Cull Update Transform | Do not write IK or Transform when off-screen. State machine updates are performed. |
| Cull Completely | No state machine updates are performed when off-screen. Animation stops completely. |
There are a few things to note about each option.First, be careful when using Root motion when setting Cull Completely.For example, if you have an animation that frames in from off-screen, the animation will stop immediately because it is off-screen.As a result, the animation will not frame in forever.
Next is Cull Update Transform.This seems like a very useful option, since it only skips updating the transform.However, be careful if you have a shaking or other Transform-dependent process.For example, if a character goes out of frame, no updates will be made from the pose at that time.When the character enters the frame again, it will be updated to a new pose, which may cause the shaking object to move significantly.It is a good idea to understand the pros and cons of each option before changing the settings.
Also, even with these settings, it is not possible to dynamically change the frequency of animation updates in detail.For example, you can optimize the frequency of animation updates by halving the frequency of animation updates for objects that are farther away from the camera.In this case, you need to use AnimationClipPlayable or deactivate Animator and call Animator.Update yourself.Both require writing your own scripts, but the latter is easier to implement than the former.
4.5. Particle System
Game effects are essential for game presentation, and Unity often uses the Particle System.In this chapter, we will introduce how to use the Particle System from the perspective of performance tuning and what to keep in mind to avoid mistakes.
The following two points are important.
- Keep the number of particles low.
- Be aware that noise is heavy.
4.5.1. Reduce the number of particles
The number of particles is related to the load, and since the Particle System is CPU-powered (CPU particles), the more particles there are, the higher the CPU load.As a basic policy, set the number of particles to the minimum necessary. Adjust the number of particles as needed.
There are two ways to limit the number of particles.
- Limit the number of particles emitted by the Emission module
- Limit the maximum number of particles in the Max Particles main module
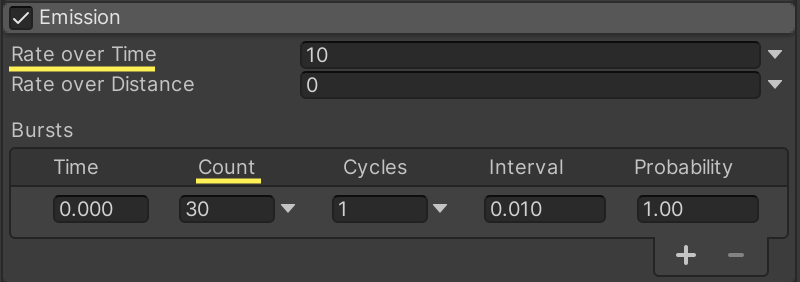
Figure 4.12: Limit on the number of emissions in the Emission module
- Rate over Time: Number of parts emitted per second
- Bursts > Count: Number of particles to be emitted at burst timing
Adjust these settings to achieve the minimum number of particles required.
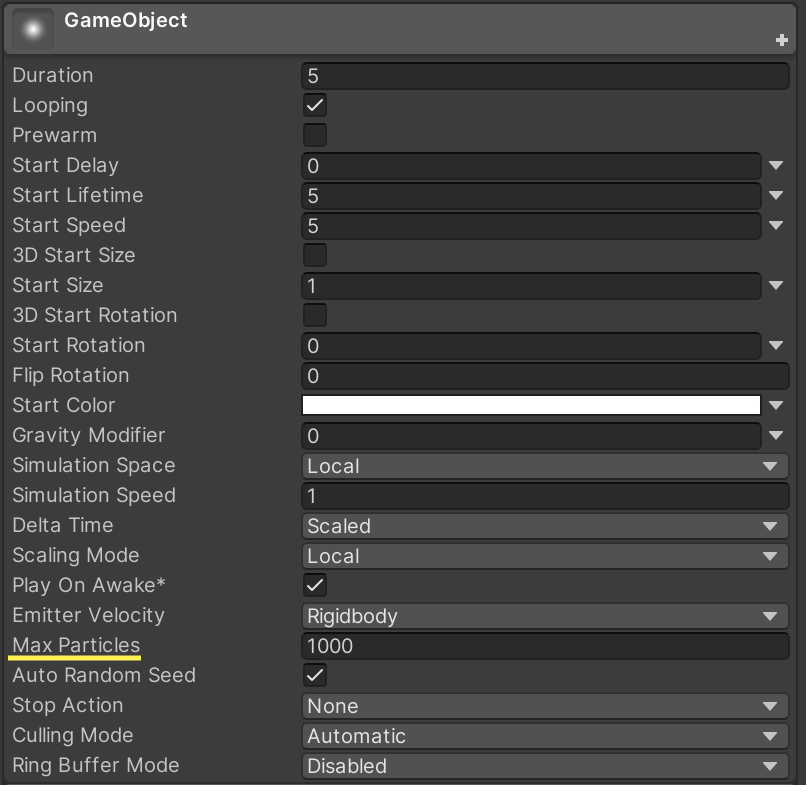
Figure 4.13: Limiting the number of particles emitted with Max Particles
Another way is to use Max Particles in the main module. In the example above, particles over 1000 will not be emitted.
Be careful with Sub Emitters
The Sub Emitters module should also be considered when reducing the number of particles.
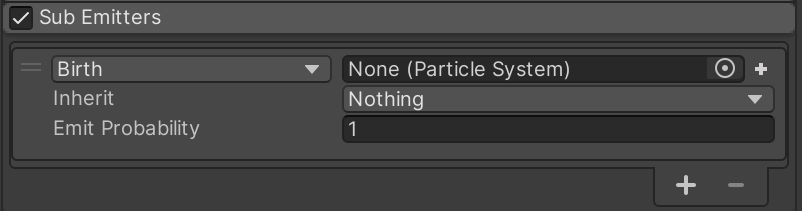
Figure 4.14: Sub Emitters Module
The Sub Emitters module generates arbitrary particle systems at specific times (at creation, at the end of life, etc.) Depending on the Sub Emitters settings, the number of particles may reach the peak number at once, so be careful when using this module.
4.5.2. Note that noise is heavy.
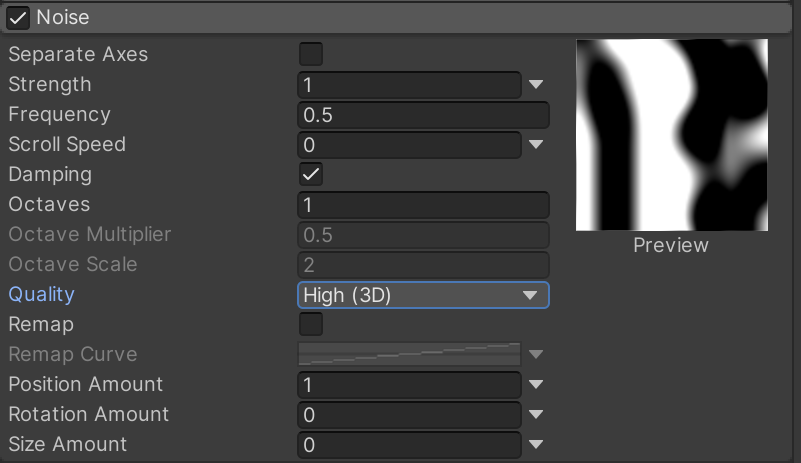
Figure 4.15: Noise Module
The Noise module's Quality is easily overloaded.Noise can express organic particles and is often used to easily increase the quality of effects.Because it is a frequently used function, you should be careful about its performance.
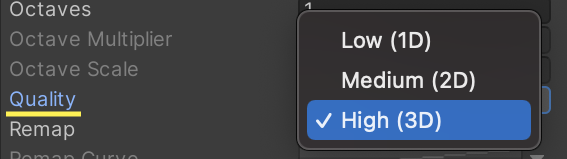
Figure 4.16: Quality of the Noise module
- Low (1D)
- Midium (2D)
- High (3D)
The higher the dimension of Quality, the higher the load. If you do not need Noise, turn off the Noise module. If you need to use noise, set the Quality setting to Low first, and then increase the Quality according to your requirements.
4.6. Audio
The default state with sound files imported has some improvement points in terms of performance. The following three settings are available.
- Load Type
- Compression Format
- Force To Mono
Set these settings appropriately for background music, sound effects, and voices that are often used in game development.
4.6.1. Load Type
There are three types of ways to load a sound file (AudioClip).
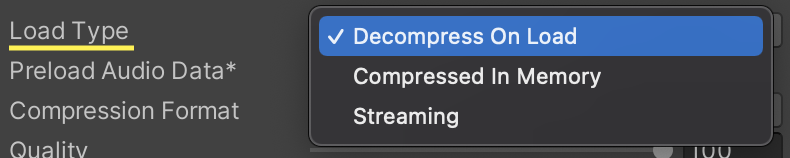
Figure 4.17: AudioClip LoadType
- Decompress On Load
- Compressed In Memory
- Streaming
Decompress On Load
Decompress On Load loads uncompressed video into memory.It is less CPU-intensive, so playback is performed with less wait time.On the other hand, it uses a lot of memory.
It is recommended for short sound effects that require immediate playback.BGM and long voice files use a lot of memory, so care should be taken when using this function.
Compressed In Memory
Compressed In Memory loads an AudioClip into memory in a compressed state.This means that it is decompressed at the time of playback.This means that the CPU load is high and playback delays are likely to occur.
It is suitable for sounds with large file sizes that you do not want to decompress directly into memory, or for sounds that do not suffer from a slight playback delay.It is often used for voice.
Streaming
Streaming, as the name implies, is a method of loading and playing back sounds.It uses less memory, but is more CPU-intensive.It is recommended for use with long BGM.
Table 4.2: Summary of Loading Methods and Main Uses
| Type | Usage |
|---|---|
| Decompress On Load | Sound Effects |
| Compressed In Memory | Voice |
| Streaming | BGM |
4.6.2. Compression Format
Compression format is the compression format of the AudioClip itself.

Figure 4.18: AudioClip Compression Format
PCM
Uncompressed and consumes a large amount of memory. Do not set this unless you want the best sound quality.
ADPCM
Uses 70% less memory than PCM, but the quality is lower, and the CPU load is much smaller than with Vorbis.The CPU load is much lower than Vorbis, which means that the speed of decompression is faster, making it suitable for immediate playback and for sounds that are played back in large quantities.This is especially true for noisy sounds such as footsteps, collisions, weapons, etc., that need to be played back quickly and in large quantities.
Vorbis
As a lossy compression format, the quality is lower than PCM, but the file size is smaller. It is the only format that allows for fine-tuning of the sound quality.It is the most used compression format for all sounds (background music, sound effects, voices).
Table 4.3: Summary of Compression Methods and Main Uses
| Type | Usage |
|---|---|
| PCM | Not used |
| ADPCM | Sound Effects |
| Vorbis | BGM, sound effects, voice |
4.6.3. Sample Rate
Quality can be adjusted by specifying the sample rate. All compressed formats are supported.Three methods can be selected from Sample Rate Setting.
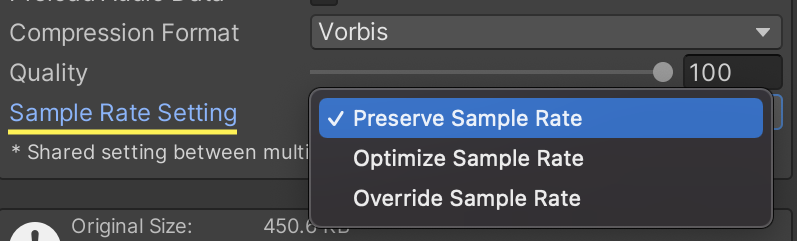
Figure 4.19: Sample Rate Settings
Preserve Sample Rate
Default setting. The sample rate of the original sound source is used.
Optimize Sample Rate
Analyzed by Unity and automatically optimized based on the highest frequency component.
Override Sample Rate
Override the sample rate of the original sound source. 8,000 to 192,000 Hz can be specified. The quality will not be improved even if the sample rate is higher than the original source. Use this option when you want to lower the sample rate than the original sound source.
4.6.4. Set Force To Mono for sound effects.
By default, Unity plays stereo, but by enabling Force To Mono, mono playback is enabled. Enabling mono playback will cut the file size and memory size in half, since there is no need to have separate data for left and right channels.
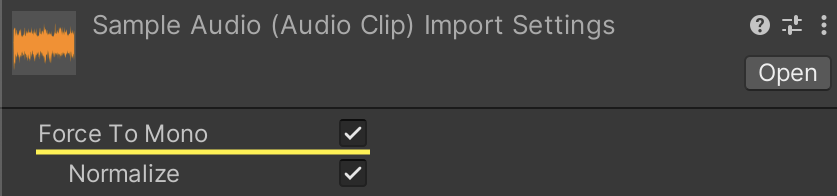
Figure 4.20: AudioClip Force To Mono
Mono playback is often fine for sound effects. In some cases, mono playback is also better for 3D sound. It is recommended to enable Force To Mono after careful consideration.The performance tuning effect is a mountain out of a molehill. If you have no problem with monaural playback, you should actively use Force To Mono.
Although this is not the same as performance tuning, uncompressed audio files should be imported into Unity.If you import compressed audio files, they will be decoded and recompressed on the Unity side, resulting in a loss of quality.
4.7. Resources / StreamingAssets
There are special folders in the project. The following two in particular require attention from a performance standpoint.
- Resources folder
- StreamingAssets folder
Normally, Unity only includes objects referenced by scenes, materials, scripts, etc. in a build.
List 4.7: Example of an object referenced by a script
// Referenced objects are included in the build [SerializeField] GameObject sample; |
The rules are different for the special folders mentioned above. Stored files are included in the build. This means that even files that are not actually needed are included in the build if they are stored, leading to an expansion of the build size.
The problem is that it is not possible to check from the program. You have to visually check for unnecessary files, which is time consuming. Be careful adding files to these folders.
However, the number of stored files will inevitably increase as the project progresses. Some of these files may be mixed in with unnecessary files that are no longer in use. In conclusion, we recommend that you review your stored files on a regular basis.
4.7.1. Resources folder slows down startup time
Storing a large number of objects in the Resources folder will increase application startup time.The Resources folder is an old-fashioned convenience feature that allows you to load objects by string reference.
List 4.8: Example of an object referenced in a script
var object = Resources.Load("aa/bb/cc/obj"); |
You can load objects with code like thisIt is easy to overuse the Resources folder because you can access objects from scripts by storing them in the Resources folder.However, overloading the Resources folder will increase the startup time of the application, as mentioned above.The reason for this is that when Unity starts up, it analyzes the structure in all Resources folders and creates a lookup table.It is best to minimize the use of the Resources folder as much as possible.
4.8. ScriptableObject
ScriptableObjects are YAML assets, and many projects are likely to manage their files as text files.By explicitly specifying an [PreferBinarySerialization] Attribute to change the storage format to binary.For assets that are mainly large amounts of data, binary format improves the performance of write and read operations.
However, binary format is naturally more difficult to use with merge tools. For assets that need to be updated only by overwriting the asset, such as those for which there is no need to check the text for changes (), or for assets whose data is no longer being changed after game development is complete, it is recommended to use. [PreferBinarySerialization] ScriptableObjects are not required to be used with ScriptableObjects.
A common mistake when using ScriptableObjects is mismatching class names and source code file names.The class and file must have the same name.Be careful with naming when creating classes and make sure that the .asset file is correctly serialized and saved in thebinary format.
List 4.9: Example Implementation of ScriptableObject
/* * When the source code file is named ScriptableObjectSample.cs */ // Serialization succeeded [PreferBinarySerialization] public sealed class ScriptableObjectSample : ScriptableObject { ... } // Serialization Failure [PreferBinarySerialization] public sealed class MyScriptableObject : ScriptableObject { ... } |