第4章. ParticleSystem 以較長時間執行 Simulate 時會產生巨大尖峰
4.1. 前言
Unity 的 ParticleSystem 提供了 ParticleSystem.Simulate,可將粒子的模擬時間控制在任意時間點。然而,若對 ParticleSystem.Simulate 指定較大的秒數,在某些情況下,開始模擬時會產生巨大的尖峰。本文將介紹其具體案例與注意事項。
4.2. 什麼是 ParticleSystem.Simulate?
ParticleSystem.Simulate 的官方文件*1使用 ParticleSystem.Simulate 時,會將粒子效果模擬到第 1 個引數所指定的時間,並可從該指定時間重新播放粒子。
清單 4.1: 從 0 秒的時間點重新播放
1 | ParticleSystem.Simulate(0f, false, true); |
如 清單 4.1 所示指定 0 秒,即可建立讓播放到一半的粒子從頭重新播放的機制。
清單 4.2: 從 5 秒的時間點重新播放
1 | ParticleSystem.Simulate(5f, false, true); |
如 清單 4.2 所示指定 5 秒,即可建立讓播放中的粒子從 5 秒的時間點重新播放的機制。
4.3. 有問題的使用方式
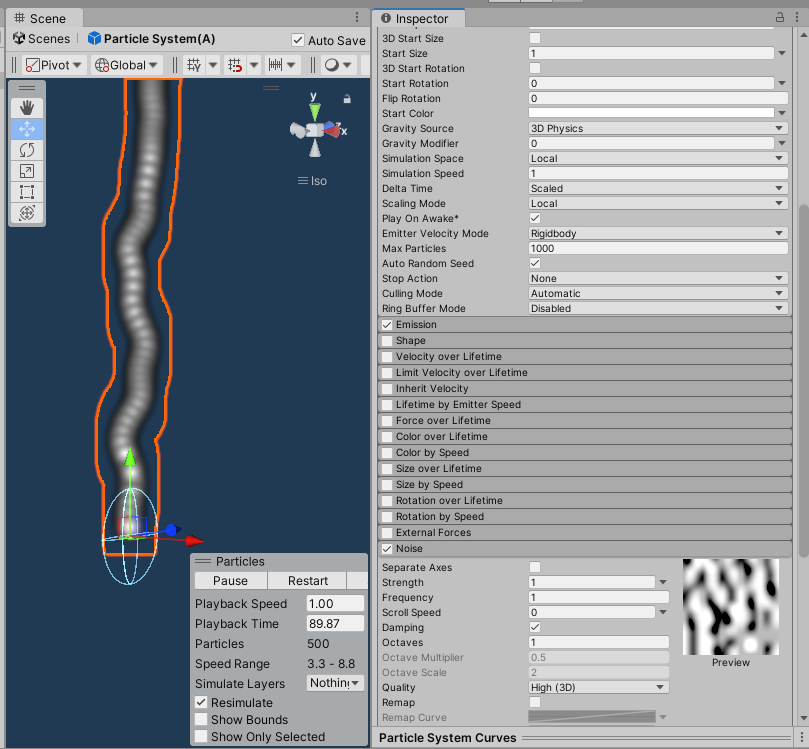
圖 4.1: 有問題的粒子
在 Unity 預設可建立的粒子上,額外開啟 Noise 模組。其他調整的參數,是為了讓粒子更容易觀察,在 Emission 模組中將發射調整為排成一直線。
清單 4.3: 從 20 秒的時間點重新播放
1 | ParticleSystem.Simulate(20f, false, false); |
而若對這類使用了 Noise 模組的粒子,像 清單 4.3 那樣在第 1 個引數指定過大的秒數進行模擬,處理過程中便會產生巨大的尖峰。
清單 4.4: 模擬的負載測量
1 2 3 4 5 6 7 8 9 10 11 12 13 14 15 16 17 18 19 20 21 22 23 24 25 26 27 28 29 30 31 32 33 | void OnClickA() { // 若有播放中的粒子則銷毀 if (_activeParticle != null) { Destroy(_activeParticle); _activeParticle = null; } // 新建立並播放 _activeParticle = Instantiate(particlePrefab, Vector3.zero, Quaternion.identity); var ps = _activeParticle.GetComponent<ParticleSystem>(); if (ps != null) { ps.Play(); } } void OnClickB() { if (_activeParticle == null) return; var ps = _activeParticle.GetComponent<ParticleSystem>(); if (ps != null) { Profiler.BeginSample("再シミュレーション"); // 重新模擬 ps.Simulate(20f, false, false); Profiler.EndSample(); ps.Play(); } } |
使用 Profiler 確認會產生多大的負載。這段程式碼以 ButtonA 建立前述粒子,以 ButtonB 模擬粒子。為了在 Unity 的 Profiler 中確認時更容易查明問題是否出在 ParticleSystem.Simulate,以 Profiler.BeginSample、Profiler.EndSample 將其包起來,方便調查。
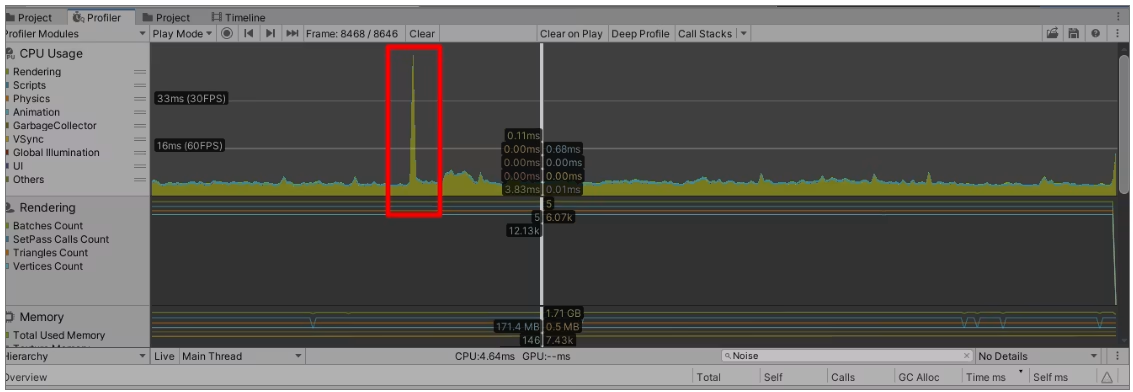
圖 4.2: 尖峰發生的情形
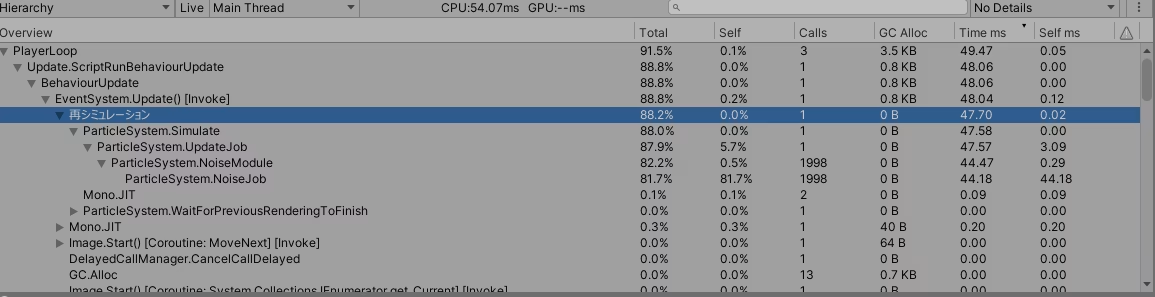
圖 4.3: 處理時間
如上所示,執行 ParticleSystem.Simulate 時,ParticleSystem 的 Noise 模組中 NoiseJob 被呼叫了約 2000 次,因此產生了約 50ms 的尖峰。藉由調低 ParticleSystem 的 Max Particles,可以稍微減少這個呼叫次數。
4.4. 結語
若需要使用 ParticleSystem.Simulate 建立從任意秒數開始產生粒子的機制,
- 是否有指定較長時間、從中途開始產生粒子的情境?
- 是否使用了 Noise 模組?
請先確認上述幾點;特別是使用已啟用 Noise 模組的粒子時,最好避免使用 ParticleSystem.Simulate。