Chapter 1. Tuning Unity 3D Character Animation
1.1. Introduction
This chapter introduces optimization techniques for 3D character animation in Unity from several perspectives, including asset settings and implementation.
1.1.1. Measurement environment
The implementation and measurements in this chapter were performed in the following environment.
Table 1.1: Measurement environment
| Item | Value |
|---|---|
| Unity | 6000.5.7f1 |
| Platform | macOS Standalone (StandaloneOSX) |
| Scripting Backend | IL2CPP / IL2CPP Compiler Configuration = Release / Code Generation = OptimizeSpeed |
| Graphics API | Metal / GPU Skinning = Enabled |
| Quality Level | PC / Skin Weights = Four Bones |
1.1.2. Assets used and their structure
The character used for measurement is based on unity-chan and was re-imported as a Generic rig. Before and after applying Optimize Game Objects, described later, it has the following specifications.
Table 1.2: Transform count and vertex count of the prefabs used for measurement
| Prefab | Transform count | Vertex count |
|---|---|---|
| Base | 166 | 13,391 |
| Optimized(Optimize Game Objects) | 24 | 13,391 |
1.2. Basic control of Unity Animation
First, let us outline the three methods for controlling animation in Unity.
1.2.1. Control using the Animator component
This is the most common method: assign RuntimeAnimatorController to Animator. It provides state machines, transitions, blend trees, and parameters, so the Mecanim workflow can be used as is.
List 1.1: Control with the Animator component
1 2 3 | var animator = GetComponent<Animator>(); animator.runtimeAnimatorController = controller; // Assign the state machine animator.SetFloat("Blend", 0.5f); // Control with parameters |
Note that the Animator internally builds and runs a Playable Graph. Both state machine evaluation and clip sampling are processed internally as graph nodes. The next two methods amount to building this internal graph yourself.
1.2.2. Build a Playable Graph with the Playable API and control it with automatic updates
In this method, you build PlayableGraph yourself. You can fully control the blend structure without a state machine, and you can insert an Animation Job (AnimationScriptPlayable), described later, at any position in the graph.
List 1.2: Graph construction with the Playable API (automatic update)
1 2 3 4 5 6 7 8 9 10 11 12 13 | var graph = PlayableGraph.Create("MyGraph"); var output = AnimationPlayableOutput.Create(graph, "Animation", animator); var clipA = AnimationClipPlayable.Create(graph, waitClip); var clipB = AnimationClipPlayable.Create(graph, walkClip); var mixer = AnimationMixerPlayable.Create(graph, 2); graph.Connect(clipA, 0, mixer, 0); graph.Connect(clipB, 0, mixer, 1); mixer.SetInputWeight(0, 0.5f); mixer.SetInputWeight(1, 0.5f); output.SetSourcePlayable(mixer); graph.Play(); |
The update mode defaults to DirectorUpdateMode.GameTime. In this mode, the graph is evaluated automatically in the Unity lifecycle (the Animation phase between Update and LateUpdate), at the same timing as the Animator component. The caller does not need to do anything every frame.
1.2.3. Build a Playable Graph with the Playable API and control it with manual updates
If you set DirectorUpdateMode.Manual on the same graph, Unity stops evaluating it automatically, and the graph is evaluated only when you call Evaluate().
List 1.3: Graph evaluation with manual updates
1 2 3 4 5 6 7 | graph.SetTimeUpdateMode(DirectorUpdateMode.Manual); graph.Play(); void Update() { graph.Evaluate(Time.deltaTime); // Evaluated only when called } |
Because you fully control the timing and frequency of evaluation, you can implement controls such as “stop updating only specific characters (graphs)” or “update only once every few frames” directly.
The relationship among the three methods is summarized below.
Table 1.3: Comparison of the three animation control methods
| Method | Graph construction | Evaluation timing |
|---|---|---|
| Animator component | Unity (internal) | Unity's Animation phase |
| Playable API + automatic update | You | Unity's Animation phase |
| Playable API + manual update | You | When Evaluate() is called |
1.3. Asset settings
Before introducing code-side optimizations, let us look at the optimizations that can be applied through asset settings. The theme of this section is eliminating the bone Transform hierarchy. There are two ways to achieve the same result.
1.3.1. Optimize Game Objects (at import)
Enabling Optimize Game Objects in the FBX import settings (Rig tab) stops the bone GameObjects / Transforms from being created at runtime, and the Animator holds only an internal skeleton. For this character, the number of Transforms dropped from 166 to 24 (root + 23 Renderers).
Note: Because the bones no longer exist as GameObjects, code that traverses the hierarchy to access bones stops working. If you need only specific bones, such as weapon attachment points, keep them individually with Extra Transforms to Expose.
1.3.2. Optimize Hierarchy (runtime)
The API that does the same thing at runtime is AnimatorUtility.OptimizeTransformHierarchy.
List 1.4: Hierarchy flattening at runtime
1 2 3 4 5 | // go is the root that has an Animator (and a valid Avatar). The second argument is an array of the bone names to expose AnimatorUtility.OptimizeTransformHierarchy(go, null); // There is also an inverse operation (for when you want to temporarily restore the hierarchy for Editor extensions or debugging) AnimatorUtility.DeoptimizeTransformHierarchy(go); |
Even for assets whose import settings you cannot change, running it at instantiation produces the same structure. In our check, applying it to the Base prefab (166 Transforms) resulted in 24 Transforms and hasTransformHierarchy == false, which was exactly the same structure as the prefab with Optimize Game Objects applied at import.
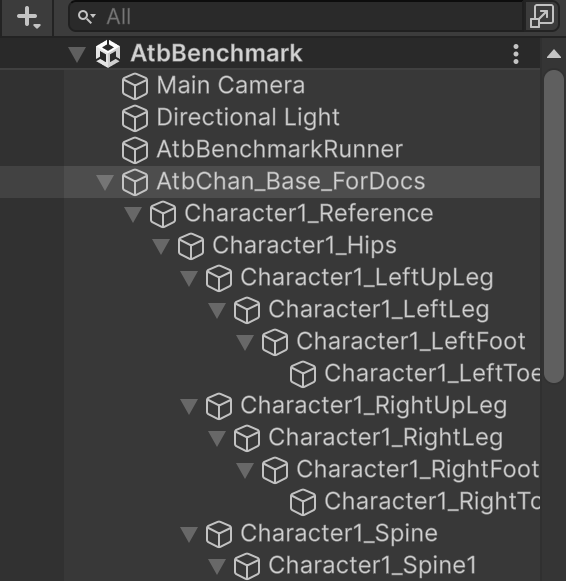
Figure 1.1: Hierarchy before optimization. 166 bone Transforms continue under Character1_Hips.
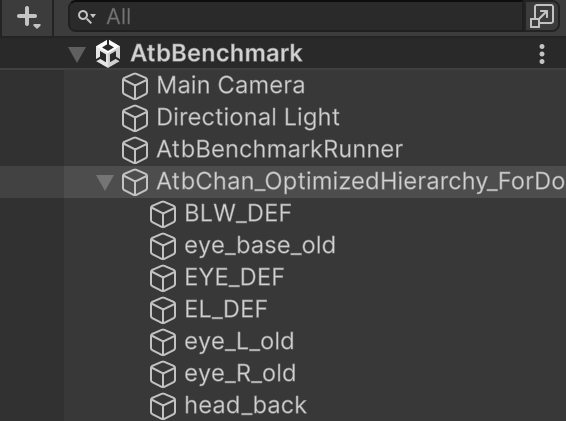
Figure 1.2: After applying AnimatorUtility.OptimizeTransformHierarchy. The bone hierarchy disappears, leaving only 23 SkinnedMeshRenderers directly under the root (24 Transforms).
1.3.3. Measurement: effect of hierarchy flattening
We measured at two levels of rendering load. The first is a configuration with all Renderers enabled (300 characters × 23 Renderers = 6,900 Renderers). The second reduces the rendering load by enabling only the one SkinnedMeshRenderer with the most vertices for each character. Frame times are medians.
Table 1.4: Effect of hierarchy flattening (300 characters with all Renderers, and 600 characters with 1 Renderer)
| Configuration | Variant | Frame time | MeshSkinning.Update (main) | MeshSkinning.CalcMatrices (all) | Semaphore.WaitForSignal |
|---|---|---|---|---|---|
| 300 characters, all Renderers | Base | 18.59 ms | 6.23 ms | 36.633 ms | 5.33 ms |
| 300 characters, all Renderers | Optimize Game Objects | 18.497 ms (±0) | 1.537 ms (−75.7 %) | 0 ms | 10.255 ms |
| 300 characters, all Renderers | Optimize Hierarchy | 18.307 ms (±0) | 1.504 ms (−76.2 %) | 0 ms | 9.977 ms |
| 600 characters, 1 Renderer | Base | 6.797 ms | 0.735 ms | 4.385 ms | 5.741 ms |
| 600 characters, 1 Renderer | Optimize Game Objects | 5.991 ms (−11.9 %) | 0.207 ms | 0 ms | 4.901 ms |
| 600 characters, 1 Renderer | Optimize Hierarchy | 6.009 ms (−11.6 %) | 0.208 ms | 0 ms | 5.010 ms |
CPU-side processing decreases by about the same proportion in both configurations. Main-thread skinning drops from 6.321 to about 1.5 ms (all Renderers) and from 0.735 to about 0.21 ms (1 Renderer), a reduction of more than 70 % in both cases. The skinning matrix calculation (MeshSkinning.CalcMatrices) disappears completely, from 36.6 ms / 4.4 ms total across all threads.
In the all-Renderers configuration, however, render thread processing is the critical path for frame time, so no reduction in frame time is seen.
In the 1-Renderer configuration with reduced rendering load, the same reduction appears directly as a frame time reduction of around 12 %. The trend is the same with 300 characters: 3.312 → 2.899 / 2.901 ms (−12.5 % / −12.4 %). The difference between Optimize Game Objects at import and Optimize Hierarchy at runtime is less than 0.1 %, which shows that when the structure is the same, the effect is the same.
The same thing appears in the Profiler Timeline. Both are frames near the median frame time, with 300 characters and all Renderers.
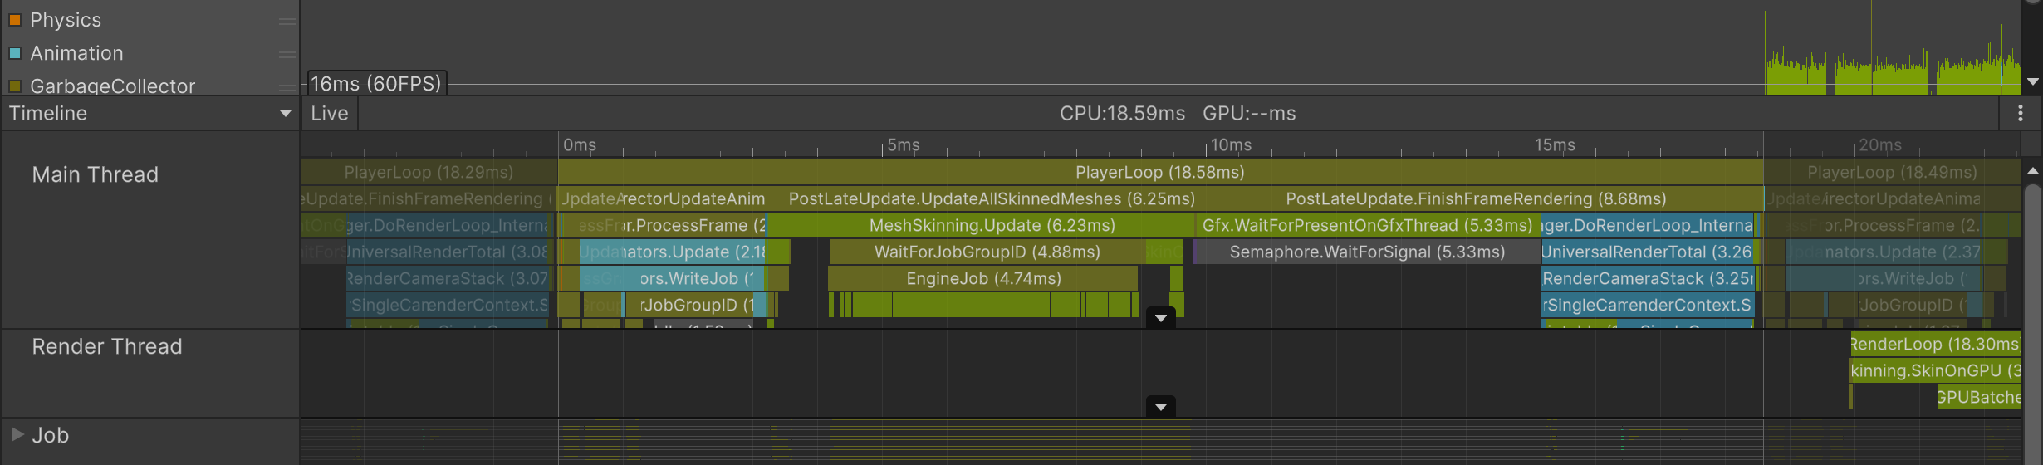
Figure 1.3: Base (166 Transforms). Of the 18.59 ms frame time, MeshSkinning.Update occupies 6.23 ms on the main thread, and Gfx.WaitForPresentOnGfxThread / Semaphore.WaitForSignal takes 5.33 ms.
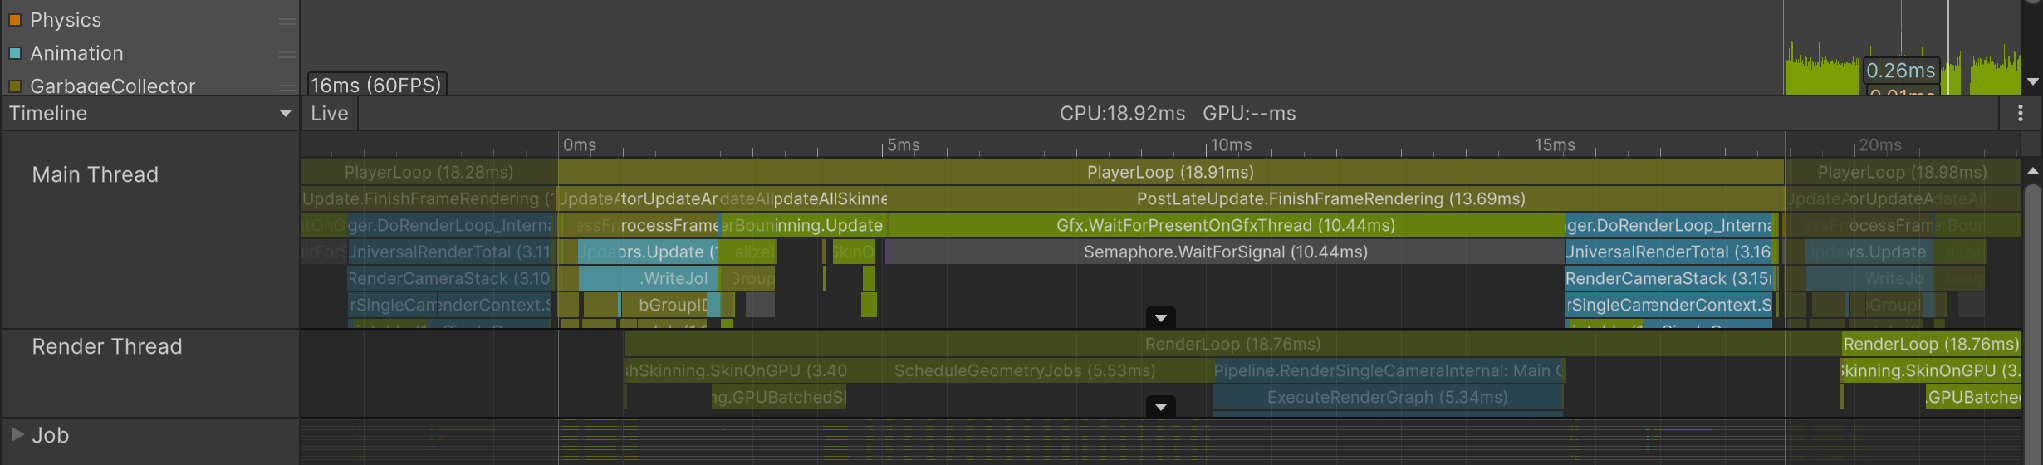
Figure 1.4: After applying AnimatorUtility.OptimizeTransformHierarchy. The MeshSkinning.Update block shrinks until its label is unreadable, while Semaphore.WaitForSignal grows from 5.33 to 10.44 ms and PlayerLoop stays almost unchanged, from 18.58 to 18.91 ms. The CPU time that was removed is replaced by wait time.
1.3.4. Measurement: all Renderers disabled (animation evaluation only)
We remove rendering and skinning entirely and look at the contribution to animation evaluation itself, with 300 characters.
Table 1.5: Frame time with all Renderers disabled
| Variant | Frame time |
|---|---|
| Base | 2.702 ms |
| Optimize Game Objects | 2.687 ms (−0.6 %) |
| Optimize Hierarchy | 2.496 ms (−7.6 %) |
Evaluation processing such as clip sampling and blending runs regardless of whether a Transform hierarchy exists, so the contribution here is almost nil. This shows that the purpose of this optimization is mainly to reduce the skinning matrix calculation and the write-back to Transforms, not the animation evaluation itself.
1.3.5. Conclusions of this chapter
- Hierarchy flattening reduces the skinning matrix calculation (
MeshSkinning.CalcMatrices) - The effect is equivalent between import time (Optimize Game Objects) and runtime (
AnimatorUtility.OptimizeTransformHierarchy) - Which to choose is an operational matter: use the import settings for assets you own, and use the runtime API when you cannot change the import settings
- Appropriately setting the vertex and bone counts of the model itself during production is the top priority
1.4. Using Job Threads
1.4.1. Unity's animation parallelization
For the Animator component and automatically updated Playable Graphs, Unity schedules all graphs together and distributes them across the Animation Job Threads.
The problem is manual updates. PlayableGraph.Evaluate() parallelizes the evaluation inside that graph and does not parallelize across graphs. Therefore, if you control N characters with the intuitive “1 character = 1 Playable Graph” configuration, you call Evaluate() N times, and the N graphs are processed serially.
This is an unavoidable specification of Unity's Playable Graph, but the countermeasure is simple: combine the N characters into one graph.
1.4.2. Measurement 1: control method × number of characters
All Renderers are disabled to isolate the cost of animation evaluation. Frame times are medians.
Table 1.6: Frame time by control method and number of characters
| Control method | 100 characters | 300 characters | 600 characters |
|---|---|---|---|
| Animator component | 0.899 ms | 2.413 ms | 5.004 ms |
| Playable API + automatic update | 0.899 ms | 2.498 ms | 5.093 ms |
| Playable API + manual update (1 graph per character) | 1.395 ms | 3.925 ms | 8.396 ms |
| Playable API + manual update (1 graph for all) | 0.800 ms | 2.115 ms | 4.500 ms |
The Animator and Playable automatic updates have almost the same cost. The claim that the Playable API is lighter does not hold, at least under the condition of simple animation control. The Animator's state machine evaluation (AnimatorControllerPlayable.PrepareFrame) takes only 2.624 ms in total across all threads even with 600 characters, of which only 0.161 ms is on the main thread, so it is extremely unlikely to become a bottleneck. (Whether 2 ms is large or small, however, depends on the game.)
Manual updates vary by a factor of 1.87 depending on the graph structure. Even with the same 600 characters, depending on how the graphs are grouped, the result can be faster or slower than automatic updates.
1.4.3. Measurement 2: how threads are used
600 characters, Renderers disabled. These are results aggregated per thread from Unity Profiler captures.
Table 1.7: Difference in thread usage by graph granularity (600 characters)
| 1 graph per character (600 graphs) | 1 graph for 600 characters | |
|---|---|---|
| Frame time | 9.490 ms | 4.928 ms |
Evaluate on the main thread | 9.028 ms | 4.556 ms |
| Number of worker threads that handled animation processing | 5 | 15 |
Animator.ProcessGraph total across all threads | 0.920 ms | 19.034 ms |
Animator.ProcessGraph per worker | 0.32 / 0.15 / 0.03 / 0.02 / 0.002 ms | about 1.19 ms each (15 workers, nearly even) |
With 1 graph per character, almost all animation processing is on the main thread. The 600 Evaluate() calls simply run one after another, and the worker threads barely work.
With 1 graph for 600 characters, all 15 worker threads execute Animator.ProcessGraph almost evenly.
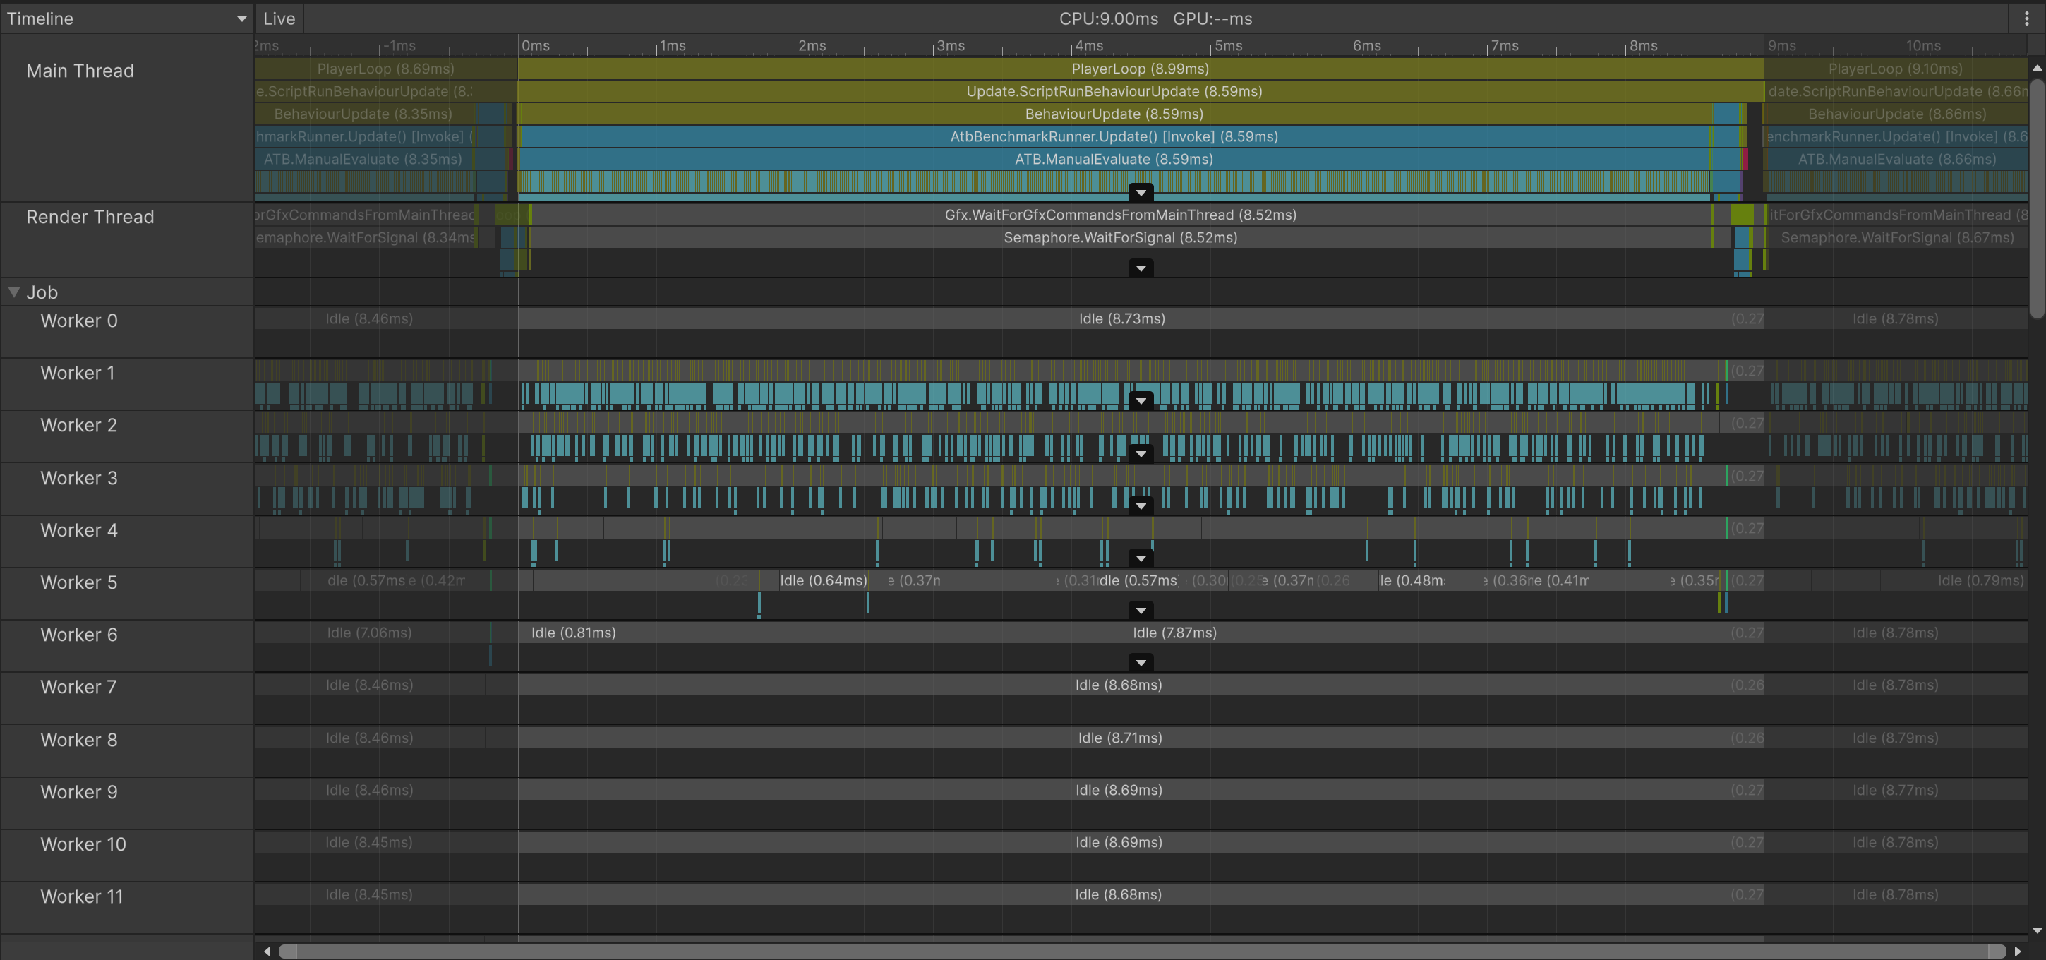
Figure 1.5: Timeline for 1 graph per character (600 graphs). ATB.ManualEvaluate on the main thread occupies about 8.6 ms, and most Job workers remain Idle.
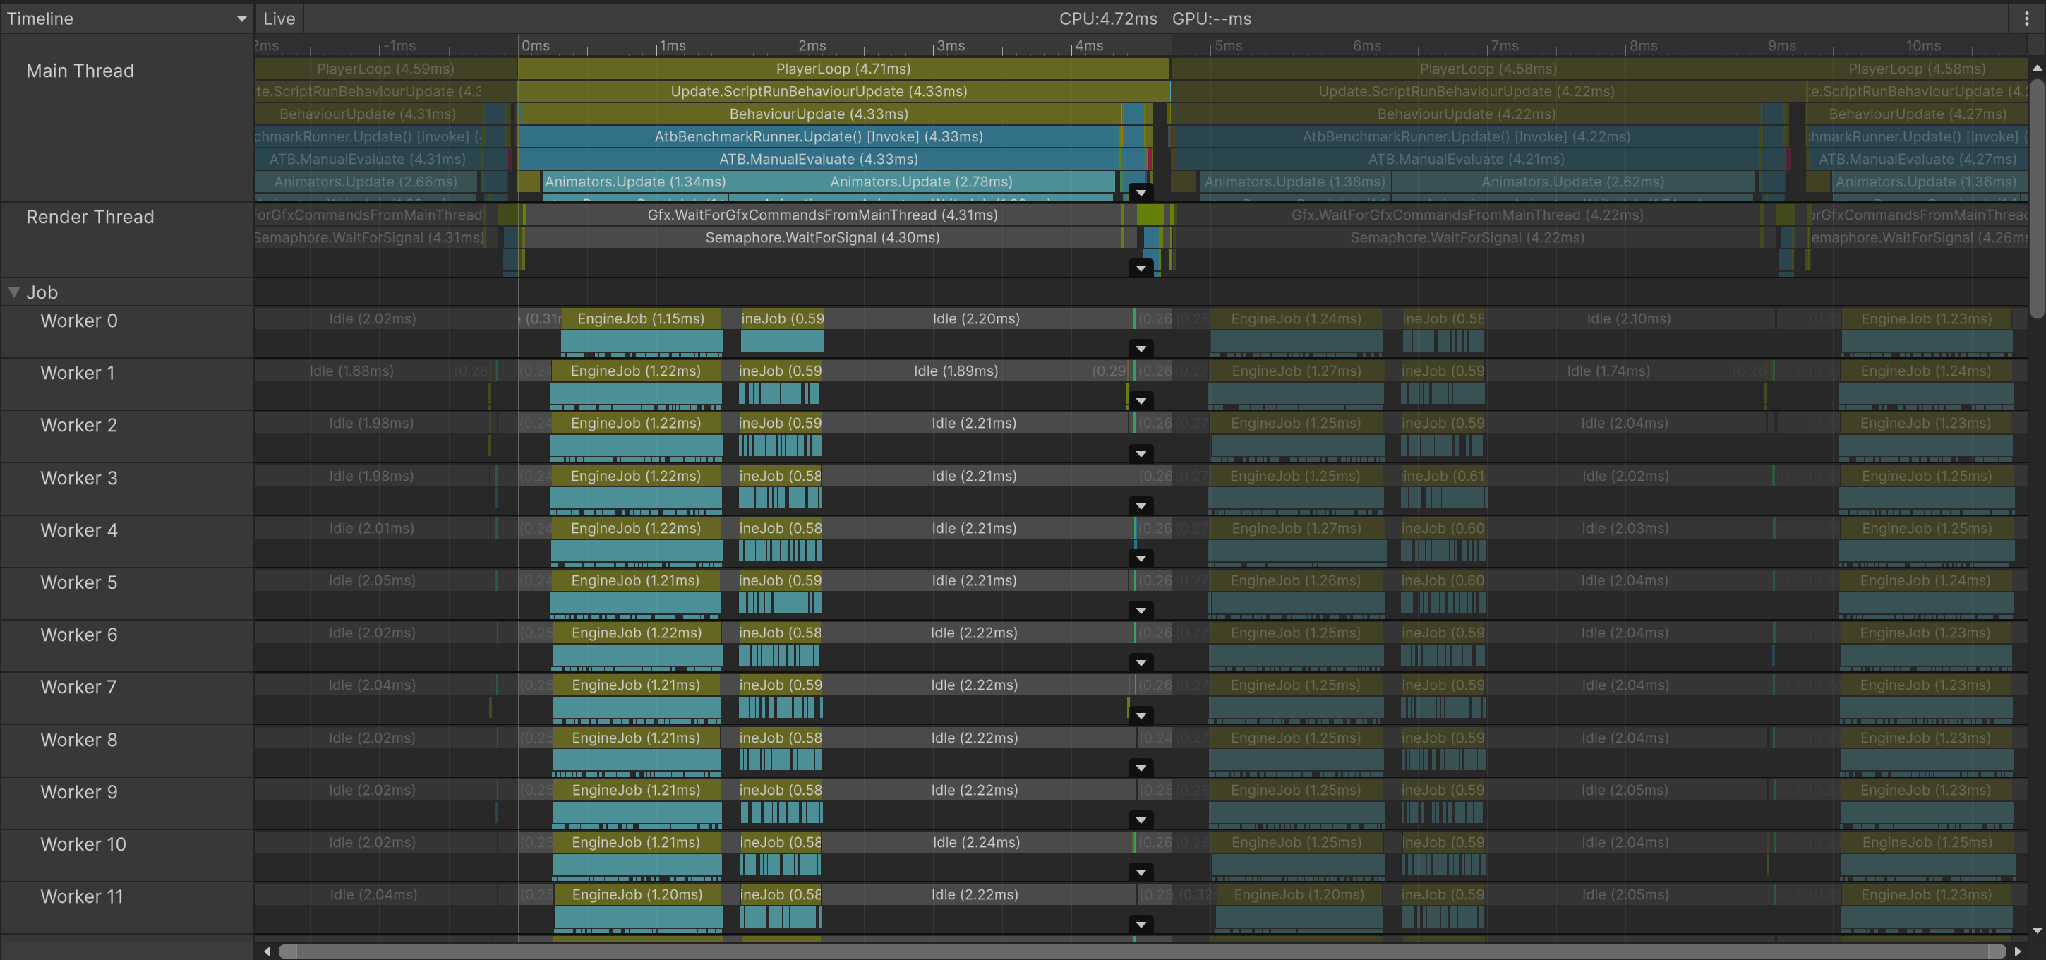
Figure 1.6: Timeline for 1 graph for 600 characters. ATB.ManualEvaluate on the main thread is halved to about 4.3 ms, and all workers simultaneously execute EngineJob for about 1.2 ms each.
One note on how to read the numbers.
The numbers in this table come from captures taken with the Unity Profiler attached, so they are slightly heavier than the measurements taken without the Profiler (4.500 ms / 8.396 ms). The summary table at the end of the chapter uses the numbers without the Profiler attached.
1.4.4. Conclusions of this chapter
Table 1.8: Summary of frame times with 600 characters
| Configuration | Frame time with 600 characters |
|---|---|
| 1 graph per character + manual update | 8.396 ms |
| Animator (automatic) | 5.004 ms |
| 1 graph for 600 characters + manual update | 4.500 ms |
- For the Animator and automatically updated Playable Graphs, Unity distributes all graphs together across the Animation Job Threads
- Manual updates are parallelized only per graph
- If you choose manual updates, always include graph granularity as a design consideration
- Replacing with the Playable API has almost no optimization effect by itself. The real value of using the Playable API lies in the flexibility of animation control, such as being able to insert Animation Jobs and control the graph structure and update timing
1.5. Using Animation C# Jobs and SIMD support
The need to control animation procedurally always arises during game development. One example is making a character's feet follow the shape of the ground so that they stay in contact with it.
One technique for this case is Two-Bone IK.
When actually implementing procedural animation control such as Two-Bone IK, there are three options.
- Rewrite Transforms directly with
LateUpdate - Insert
IAnimationJobintoAnimationScriptPlayable - In addition to 2, compile with Burst
Here we focus on the performance of these methods.
All three were implemented to perform exactly the same computation. The solver is factored out into a single static method, and the LateUpdate, Job, and Burst versions share it, so the only difference is where it runs.
1.5.1. What are Animation C# Jobs
Animation C# Jobs is a mechanism that, through AnimationScriptPlayable and IAnimationJob, lets you insert your own processing into the animation evaluation pipeline. A job is called in the same flow as clip evaluation and blending, and accesses bones through AnimationStream and TransformStreamHandle.
The difference from LateUpdate is where the code runs. LateUpdate rewrites the Transforms directly on the main thread after animation evaluation has finished. The processing accumulates serially on the main thread in proportion to the number of characters. An Animation Job is called inside the evaluation pipeline (on the Animation Job Thread), so Unity can distribute it across worker threads just like the rest of the animation evaluation. Even with the same computation, whether it burdens the main thread changes.
The access restriction of going through AnimationStream is the price for this. A job can see only the handles bound in advance, and cannot touch an arbitrary Transform or GameObject.
1.5.2. Implementation
The job body simply calls the solver with ProcessAnimation.
List 1.6: Animation Job for Two-Bone IK (Burst-compatible)
1 2 3 4 5 6 7 8 9 10 11 12 13 14 15 16 17 18 19 | [BurstCompile] public struct TwoBoneIkJobBurst : IAnimationJob { public TransformStreamHandle Root; public TransformStreamHandle Mid; public TransformStreamHandle Tip; public NativeArray<float3> Target; // Length 1. Written from the main thread every frame public float Weight; public int Iterations; public void ProcessRootMotion(AnimationStream stream) { } [BurstCompile] public void ProcessAnimation(AnimationStream stream) { TwoBoneIkCore.SolveStreamIterations( ref stream, Root, Mid, Tip, Target[0], Weight, Iterations); } } |
Bones are read and written with the pair of TransformStreamHandle and AnimationStream.
List 1.7: Reading and writing bones from the AnimationStream
1 2 3 4 5 6 7 8 9 10 11 12 13 14 15 16 17 | static void SolveStream( ref AnimationStream stream, TransformStreamHandle root, TransformStreamHandle mid, TransformStreamHandle tip, float3 target, float weight) { var rootPosition = (float3)root.GetPosition(stream); var midPosition = (float3)mid.GetPosition(stream); var tipPosition = (float3)tip.GetPosition(stream); var rootRotation = (quaternion)root.GetRotation(stream); var midRotation = (quaternion)mid.GetRotation(stream); Solve(rootPosition, midPosition, tipPosition, target, rootRotation, midRotation, weight, out var newRootRotation, out var newMidRotation); mid.SetRotation(stream, newMidRotation); root.SetRotation(stream, newRootRotation); } |
Create the handles with Animator.BindStreamTransform, and insert the job into the graph after the clip.
List 1.8: Inserting an Animation Job into the graph
1 2 3 4 5 6 7 8 9 10 11 12 13 14 | var job = new TwoBoneIkJobBurst { Root = animator.BindStreamTransform(rootTransform), Mid = animator.BindStreamTransform(midTransform), Tip = animator.BindStreamTransform(tipTransform), Target = ikTarget, // NativeArray<float3> Weight = 1f, Iterations = iterations, }; var ikPlayable = AnimationScriptPlayable.Create(graph, job, 1); graph.Connect(clipSource, 0, ikPlayable, 0); // clipSource = mixer on the clip side ikPlayable.SetInputWeight(0, 1f); output.SetSourcePlayable(ikPlayable); |
Inputs that change every frame, such as the IK target, are placed in NativeArray and written from the main thread.
Burst is applied by adding the BurstCompile attribute to the class.
You can check whether Burst Compiler optimization is actually taking effect with tools such as the Burst Inspector.
1.5.3. Measurement
300 characters, Renderers disabled. The number of IK solves per character is varied among 1 / 16 / 64.
Table 1.9: Frame time by number of IK solves (300 characters, Renderers disabled)
| Implementation | 1 solve | 16 solves | 64 solves |
|---|---|---|---|
| No IK (baseline) | 2.501 ms | 2.601 ms | 2.596 ms |
| LateUpdate | 2.699 ms | 4.400 ms | 9.094 ms |
| Animation Job | 2.411 ms | 2.496 ms | 2.795 ms |
| Animation Job + Burst | 2.494 ms | 2.496 ms | 2.792 ms |
CPU time breakdown (at 64 solves):
Table 1.10: CPU time breakdown by IK implementation (64 solves)
| Implementation | IK CPU time (all threads) | Of which main thread | Added to frame time |
|---|---|---|---|
| LateUpdate | 6.910 ms | 6.910 ms(100 %) | +6.498 ms |
| Animation Job | 7.790 ms | 0.487 ms(6.3 %) | +0.199 ms |
| Animation Job + Burst | 6.932 ms | 0.436 ms(6.3 %) | +0.196 ms |
1.5.4. Differences in execution threads seen in the Profiler Timeline
Which thread executes the same computation appears in the Unity Editor's Profiler. The following shows captures with 64 solves and 300 characters opened in the Profiler window, with a frame near the median frame time selected. Because these are captures taken with the Profiler attached, they do not match the numbers in the table above exactly.
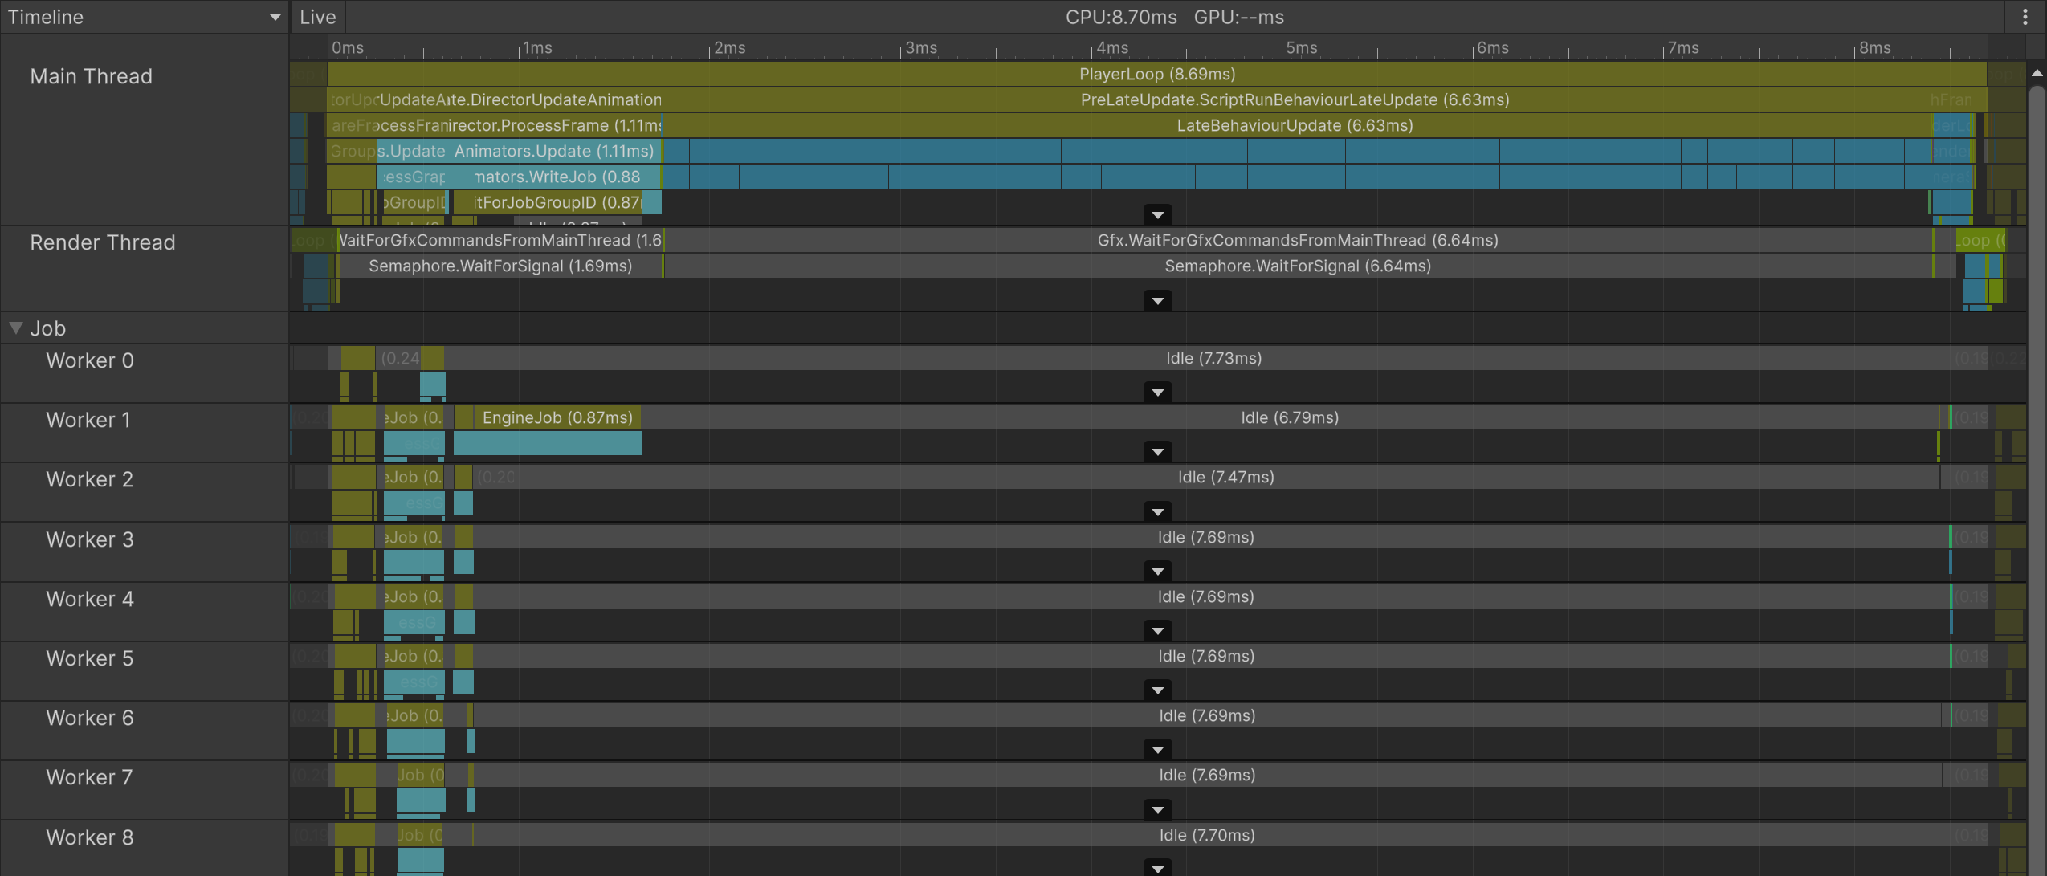
Figure 1.7: LateUpdate implementation. Of the 8.698 ms frame time, LateBehaviourUpdate occupies 6.63 ms. The 15 worker threads stay Idle for most of the frame (about 6.8 to 7.7 ms).
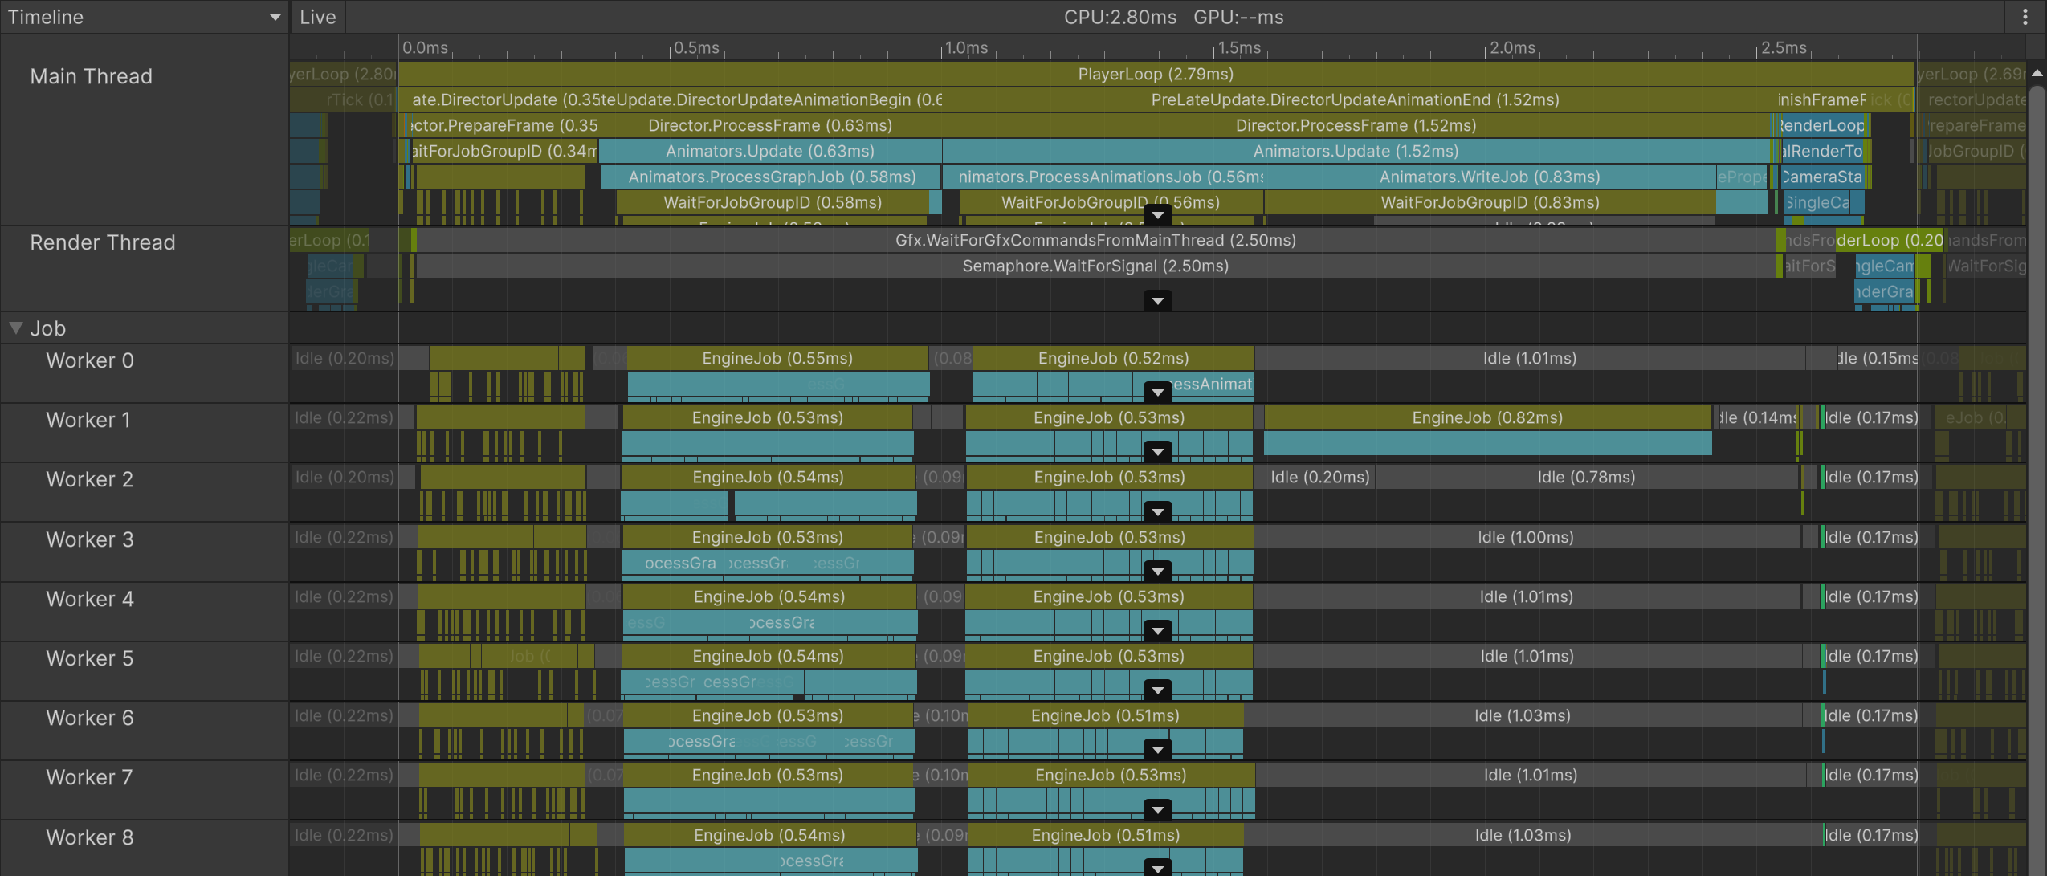
Figure 1.8: Animation Job implementation. The same computation is distributed as AnimationScriptPlayable.ProcessAnimation across the 15 worker threads, each executing for about 0.5 ms. The frame time is 2.796 ms.
In the LateUpdate implementation, the ATB.TwoBoneIk.LateUpdate for 300 characters (6.577 ms in total) is entirely inside LateBehaviourUpdate on the main thread. The worker threads handle only the base animation evaluation (Animator.ProcessGraph at 0.12 to 0.29 ms per thread), and none of the IK computation appears on them.
In the Animation Job implementation, AnimationScriptPlayable.ProcessAnimation totals 7.891 ms across all threads, of which 0.498 ms is on the main thread. The remaining 7.393 ms is distributed almost evenly across the 15 worker threads (0.47 to 0.51 ms per thread). The total CPU time is higher than in the LateUpdate implementation, but because it is split across 16 threads, the frame time falls from 8.698 to 2.796 ms.
1.5.5. What can be read from this
In this case, the most effective optimization is not Burst but moving the execution thread. The LateUpdate implementation pays the entire IK CPU time on the main thread, so at 64 solves the frame time grows from 2.596 to 9.094 ms. Moving the same computation to an Animation Job almost eliminates the main-thread burden, and the amount added to frame time differs by a factor of 33.
On the other hand, the LateUpdate version has the lower total CPU time. An Animation Job has a fixed cost per AnimationScriptPlayable node, which is about 2.16 ms for 300 characters. The gain from parallelization still far outweighs it.
Under the more realistic condition of one solve per character, the differences among the three implementations are within measurement noise. For Two-Bone IK with around 300 characters, no implementation makes a perceptible difference.
1.5.6. Burst does not help just by adding the attribute
The belief that adding [BurstCompile] makes code use SIMD and run several times faster is incorrect. In this measurement, Burst reduces the total CPU time by 11.0 %. Looking at the marginal cost per solve after subtracting the fixed node cost,
- Without Burst: (7.790 − 2.157) / 63 = 0.0894 ms
- With Burst: (6.932 − 2.167) / 63 = 0.0756 ms (−15.4 %)
What Burst does is generate native code with LLVM, and whether SIMD instructions are emitted depends on the shape of the code as written. Unless you implement code that can be properly vectorized with SIMD, you will not get a large benefit.
Animation C# Jobs has two properties that make SIMD vectorization difficult.
Reads and writes of AnimationStream appear frequently in the processing. For each solve, bones are read with GetPosition and GetRotation and written back with SetRotation. Because the stream state changes with every iteration, dependencies remain between iterations, and multiple iterations cannot be bundled into a single vector instruction. Furthermore, the AnimationStream received by IAnimationJob covers only one character, so the job does not contain the data needed to compute four characters at once in the first place.
Transcendental functions are used heavily. These include acos, which obtains the bend angle from the law of cosines, the trigonometric functions that quaternion.AxisAngle calls internally, and the square root in math.length. These become cross-lane computations or scalar library calls, which stops vectorization.
Burst's LLVM also explicitly reports that it cannot vectorize the loop that repeatedly calls the solver (optimization remark loop not vectorized: instruction return type cannot be vectorized).
1.5.7. Strategy for fully using the benefits of Burst
To make full use of Burst, a candidate is a configuration that uses C# Job System to read and write Transforms without going through AnimationStream. Reading and writing Transforms can be consolidated on the job side with TransformAccessArray and IJobParallelForTransform, and you can also leave only bone gathering and write-back to the Animation Job and split the heavy computation into a batch job that handles N characters together. In both cases, the data for N characters is gathered inside a single job rather than per character, so the precondition for SIMD vectorization is met.
In addition, the contents of the batch job need to be arranged as follows.
- Use SoA (Structure of Arrays), with one array per component, so that characters are contiguous in memory
- Replace branches with
math.selectormath.maxso that the loop body becomes a single straight line - Move transcendental functions out of the loop (rewrite them with identities, use lookup tables, or approximate them)
- Write the code with
float4rather thanfloat3, one lane per character for four characters, so that it does not depend on the auto-vectorizer's decisions
The cost is design complexity. The greatest advantage of IAnimationJob is the convenience of being able to touch the latest bone state at the correct timing in the evaluation pipeline just by inserting one node into the graph, and this strategy gives that up. This chapter does not measure this configuration, so it does not show how much faster it would be. Treat it as a proposal: if you expect Burst to give several times the effect, a design change in this direction is a prerequisite.
1.5.8. Conclusions of this chapter
- The value of an Animation Job lies in being able to use the Animation Job Thread
- While the amount of computation is small, the fixed per-node cost of
AnimationScriptPlayableis larger. Writing it plainly in LateUpdate gives a lower total CPU time - Adding
[BurstCompile]alone does not result in SIMD. You need to design the data and processing with SIMD application in mind
1.6. Implementing animation LOD
1.6.1. Mechanism and where it is effective
Depending on the game specification, there is basically no need to update even distant characters every frame. If you update only once every N frames, the average load (cost) of that character becomes 1/N. This is “animation LOD”. It applies the same idea as mesh LOD, which controls rendering cost in stages by distance, to the animation update frequency.
It is effective in situations such as the following.
- There are hundreds of characters on screen, and most are in the background or are crowd characters
- Motion equivalent to 30 fps / 15 fps is perceptually acceptable for distant characters (the farther the camera, the less noticeable the thinning)
- Animation evaluation accounts for a non-negligible share of the frame time
Conversely, if it is applied to a character in close-up, the stutter is immediately noticeable. In practice, the expected approach is to switch the thinning level according to distance or screen occupancy.
1.6.2. Simple implementation: call Animator.Update() yourself
Set animator.enabled = false to stop Unity's automatic updates, and call Animator.Update() explicitly only on the frames that need an update. The time for the skipped frames is accumulated and passed in.
This implementation has the side effect of losing the parallelism on the Animation Job Thread described so far.
List 1.9: Thinning implementation that calls Animator.Update() itself
1 2 3 4 5 6 7 8 9 10 11 12 13 14 | animator.enabled = false; // At initialization. Stop Unity's automatic updates void Update() { foreach (var character in _characters) { character.PendingDeltaTime += Time.deltaTime; if (_frameIndex % interval != character.Slot) continue; // Slot = index % interval character.Animator.Update(character.PendingDeltaTime); // Explicit update with the accumulated time character.PendingDeltaTime = 0f; } _frameIndex++; } |
1.6.3. Implementation example using the Playable API directly
For a manually updated (DirectorUpdateMode.Manual) Playable Graph, you simply thin out the calls to Evaluate() itself.
List 1.10: Implementation that thins out Evaluate() on a manually updated graph
1 2 3 4 5 6 7 8 9 10 11 12 13 14 15 | graph.SetTimeUpdateMode(DirectorUpdateMode.Manual); graph.Play(); void Update() { foreach (var character in _characters) { character.PendingDeltaTime += Time.deltaTime; if (_frameIndex % interval != character.Slot) continue; character.Graph.Evaluate(character.PendingDeltaTime); character.PendingDeltaTime = 0f; } _frameIndex++; } |
One note: in the configuration recommended in the previous chapter, “consolidate all characters into one graph”, the whole graph is evaluated with a single Evaluate() call, so per-character thinning cannot be expressed. With one graph per character, as in the code above, you can thin updates, but you lose the parallelization gained from consolidation.
In both implementations, Slot (phase) is important. If all characters are updated on the same frame, the load concentrates on that frame. If you offset the phase with index % interval, 1/N of the characters are updated every frame.
1.6.4. Measurement
600 characters, Renderers disabled. First, the implementation using the Animator.
The mean represents the total load over 12 seconds, and the gap between the median and p95 represents how erratic the frame time is.
Table 1.11: Frame time statistics for thinning and phase offset (Animator, 600 characters)
| Method | Mean | Median | p95 | p99 | Max | Standard deviation |
|---|---|---|---|---|---|---|
| Update every frame (Animator automatic) | 5.037 ms | 5.000 ms | 5.303 ms | 5.707 ms | 16.901 ms | 0.433 |
| Once every 2 frames, no phase offset | 4.781 ms | 0.648 ms | 9.607 ms | 9.816 ms | 12.194 ms | 4.544 |
| Once every 2 frames, phase offset | 4.831 ms | 4.803 ms | 5.099 ms | 5.212 ms | 8.804 ms | 0.171 |
| Once every 4 frames, no phase offset | 2.613 ms | 0.382 ms | 9.470 ms | 9.658 ms | 11.171 ms | 3.863 |
| Once every 4 frames, phase offset | 2.578 ms | 2.593 ms | 2.707 ms | 2.908 ms | 11.722 ms | 0.185 |
The same trend appears with the Playable API (1 graph per character, manual update).
Table 1.12: Frame time statistics for thinning and phase offset (Playable API, 1 graph per character)
| Method | Mean | Median | p95 | Standard deviation |
|---|---|---|---|---|
| Update every frame | 8.496 ms | 8.493 ms | 9.001 ms | 0.337 |
| Once every 4 frames, no phase offset | 2.438 ms | 0.369 ms | 8.855 ms | 3.570 |
| Once every 4 frames, phase offset | 2.486 ms | 2.495 ms | 2.613 ms | 0.173 |
1.6.5. Offsetting the phase does not reduce the load; it flattens it
When updates are thinned to one quarter, the mean is almost the same with or without a phase offset, and the total load is almost the same. Offsetting the phase does not reduce the work.
The frame time distributions, however, differ as follows.
- No phase offset: out of every 4 frames, 3 frames do nothing, and 1 frame processes all 600 characters at once. The median drops, but p95 and the standard deviation jump
- Phase offset: 150 characters are processed every frame. The median and p95 nearly coincide, and the variation is small
If you look only at the median of 0.382 ms and celebrate a 1/13 reduction, you end up with a game that has a 9.5 ms spike once every 4 frames. Phase offset is a measure for perceived quality, and the standard deviation of 0.185 is more stable than the 0.433 of updating every frame.
This difference in distribution appears directly in the Profiler's CPU chart (both are captures with the Profiler attached, so they are heavier than the non-attached numbers in the table above. The vertical axis scale of the chart is auto-adjusted, so it differs between the two images).
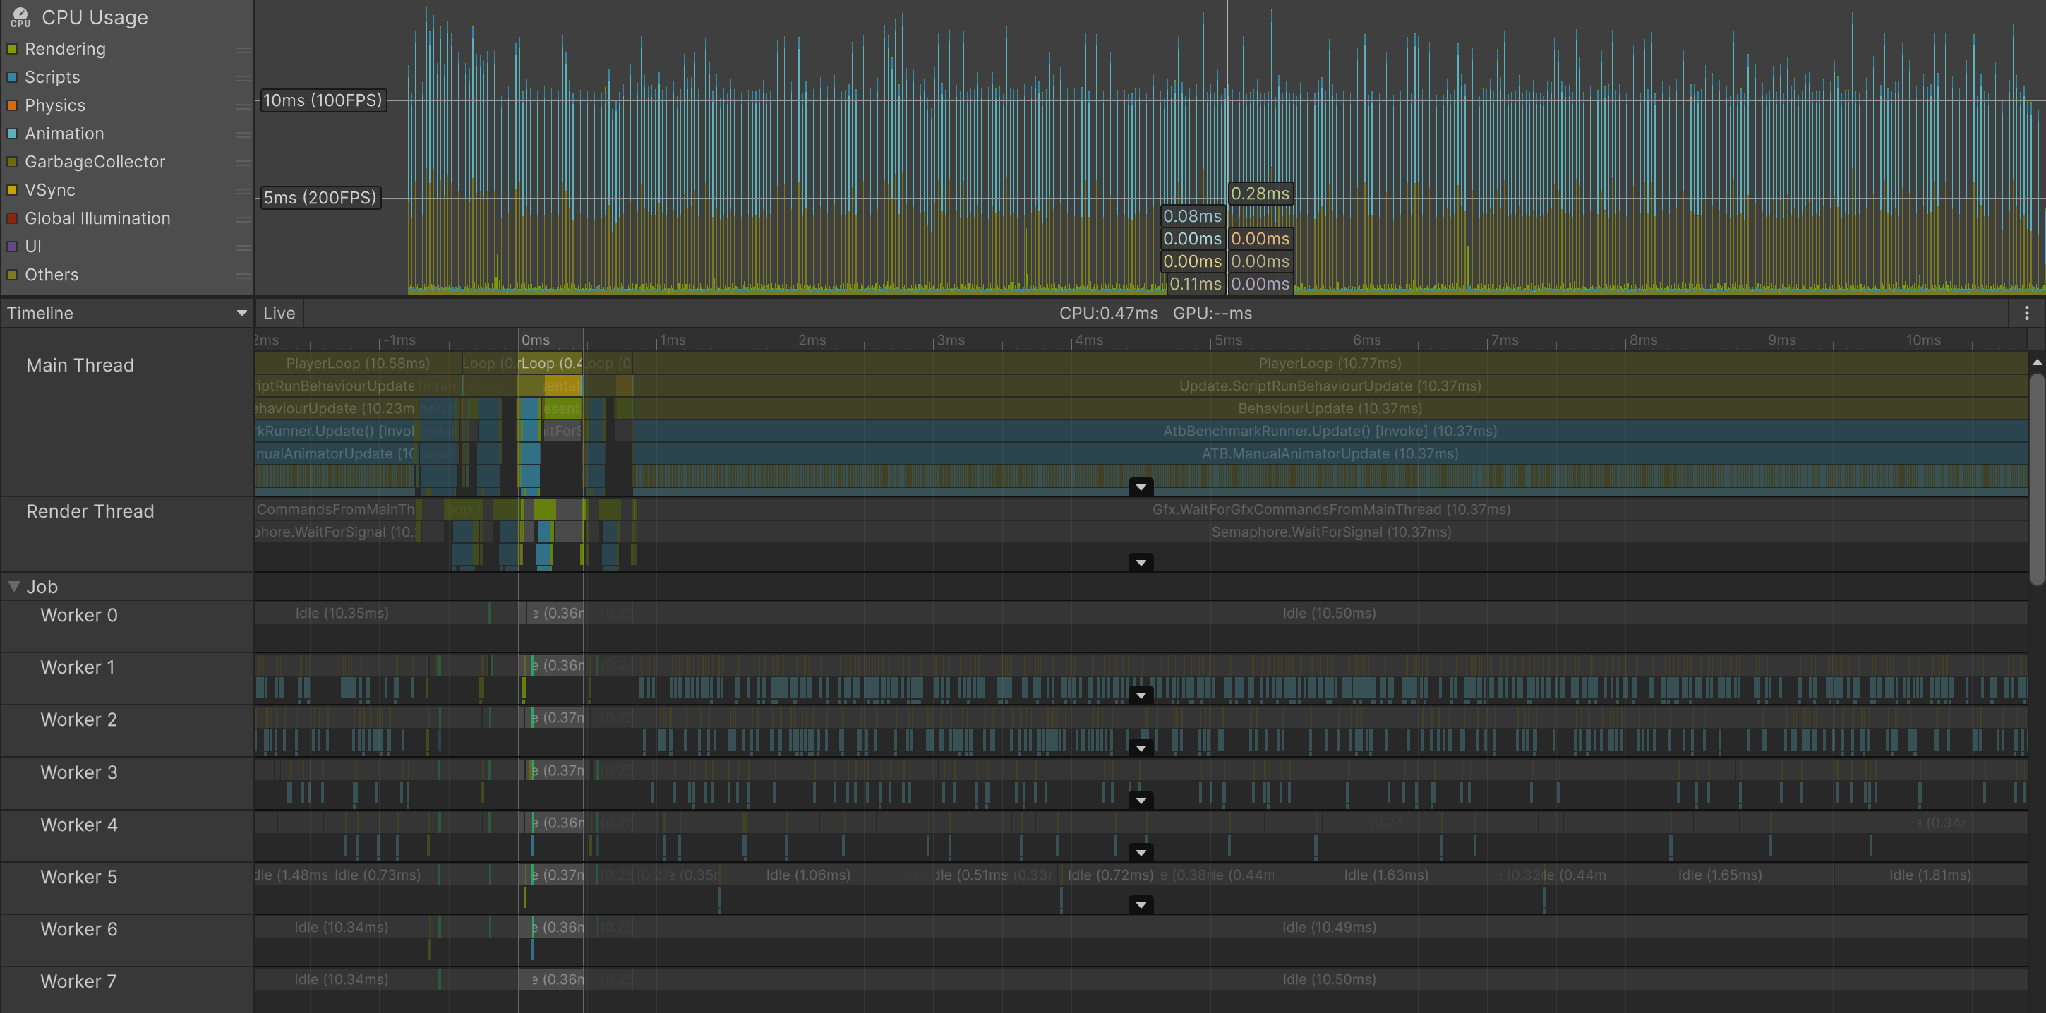
Figure 1.9: Once every 4 frames, no phase offset. The CPU chart forms a comb shape of “3 valley frames near 0 ms + 1 spike frame of about 10 ms”. In the Timeline below, on both sides of the selected empty frame (0.47 ms) are frames where ATB.ManualAnimatorUpdate processes all 600 characters at once (10.37 ms).
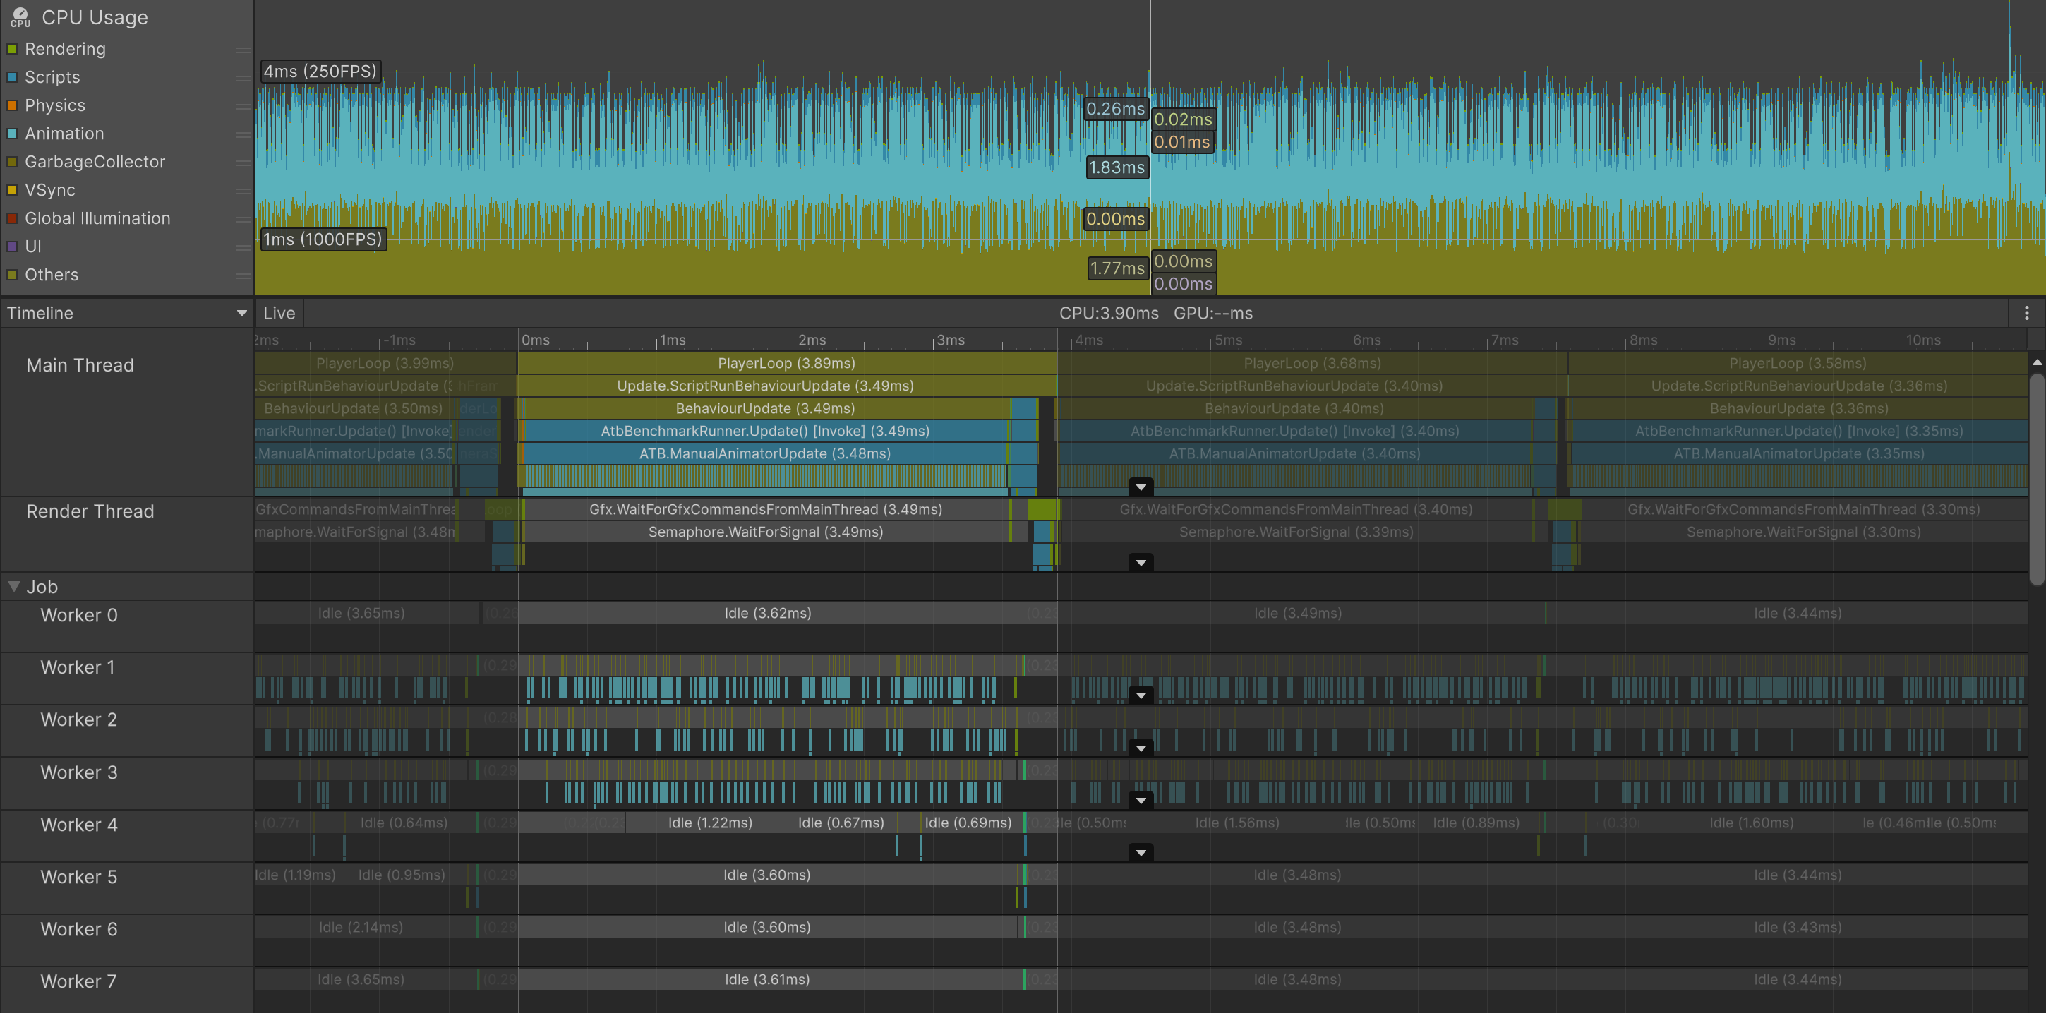
Figure 1.10: Once every 4 frames, phase offset. Because 150 characters are processed every frame, the waveform is flat (about 3.5 ms) and the spikes are gone.
1.6.6. The naive implementation loses parallelism
Thinning to once every 2 frames removes almost nothing. Although the number of updates is halved, the reduction in mean frame time is only 4.1 %.
The reason can be seen in the breakdown of the Profiler markers.
Table 1.13: Parallelism lost in the naive thinning implementation
| Method | Characters updated per frame | Animation update time on the main thread | Animator.ProcessGraph total across all threads | Of which main thread |
|---|---|---|---|---|
| Update every frame (Unity's batch update) | 600 | Animators.Update 4.046 ms | 20.104 ms | 1.257 ms |
| Once every 2 frames, phase offset | 300 | ATB.ManualAnimatorUpdate 4.532 ms | 0.549 ms | 0.317 ms |
| Once every 4 frames, phase offset | 150 | ATB.ManualAnimatorUpdate 2.316 ms | 0.278 ms | 0.180 ms |
With an update every frame, only 6 % of the work remains on the main thread, and the rest is spread across the worker threads. When you call Animator.Update() explicitly, however, it is evaluated synchronously on the spot, so the worker threads are barely used. You give up the parallelization of Unity's batch update in exchange for thinning.
Converted to the main-thread cost per character,
- Update every frame: 4.046 ms / 600 characters = 6.7 µs per character (parallel)
- Once every 2 frames: 4.532 ms / 300 characters = 15.1 µs per character (serial)
- Once every 4 frames: 2.316 ms / 150 characters = 15.4 µs per character (serial)
The moment it becomes serial, the cost per character rises by about 2.3 times, and after that it is constant regardless of the thinning ratio. In other words, the 2x reduction obtained from 2x thinning is almost canceled out by the 2.3x degradation from serialization. The measured 4.1 % is merely the residual.
With the naive implementation, a substantial effect appears only at 4x thinning (−48.8 %). This is, however, an avoidable loss.
1.6.7. Thinning while preserving parallelism
It is unavoidable that Animator.Update() is synchronous. However, if you choose every frame which characters take part in Unity's batch update, you can thin updates while preserving parallelism. There are two implementations, and both keep using the Animator (and its state machine).
Method 1: toggle Animator.enabled
Unity's animation update collects the Animators that are enabled at that moment into one batch and distributes it across the Animation Job Threads. Therefore, instead of calling Animator.Update(), you only need to set enabled = true on just the characters you want updated on that frame. Unity performs the evaluation, so the parallelization remains.
List 1.11: Thinning implementation that toggles Animator.enabled
1 2 3 4 5 6 7 8 9 10 11 12 13 14 15 16 17 18 19 20 | // At initialization. Make up for skipped frames with speed foreach (var character in _characters) { var animator = character.Animator; animator.keepAnimatorStateOnDisable = true; // Do not rewind the state on disabling (required) animator.speed = interval; // Compensate for being updated only once every interval frames } void Update() { foreach (var character in _characters) { var scheduled = _frameIndex % interval == character.Slot; if (character.Animator.enabled != scheduled) { character.Animator.enabled = scheduled; // Only choose which characters take part in Unity's batch update } } _frameIndex++; } |
Do not forget keepAnimatorStateOnDisable = true. With the default false, the controller state is rewound every time the Animator is disabled, and the animation does not advance.
The constraint is that Animator.speed is a rate. You cannot pass the accumulated Δt exactly, as with Animator.Update(pendingDeltaTime), and it advances only by the Time.deltaTime × interval of the update frame. In an environment where the frame time fluctuates, the progress also fluctuates, but the average playback speed is preserved.
Method 2: split graphs by phase
The conclusion of the previous chapter was that “combining N characters into one manual graph enables parallelization”. We combine this with thinning. Create as many graphs as there are phases, and call Evaluate() on only one graph per frame. Each graph holds N/interval characters, so parallelization works within that single Evaluate() call.
If you have the graph hold the state machine as AnimatorControllerPlayable, the same evaluation runs as when it is assigned to an Animator component.
List 1.12: Thinning implementation that splits graphs by phase
1 2 3 4 5 6 7 8 9 10 11 12 13 14 15 16 17 18 19 20 21 22 23 24 25 26 27 | // At initialization: one manual graph per phase bucket for (var bucket = 0; bucket < interval; bucket++) { var graph = PlayableGraph.Create($"Bucket_{bucket}"); graph.SetTimeUpdateMode(DirectorUpdateMode.Manual); _bucketGraphs[bucket] = graph; } foreach (var character in _characters) { var graph = _bucketGraphs[character.Slot]; character.Animator.runtimeAnimatorController = null; // Leave the evaluation to the graph var output = AnimationPlayableOutput.Create(graph, "Animation", character.Animator); output.SetSourcePlayable(AnimatorControllerPlayable.Create(graph, controller)); } foreach (var graph in _bucketGraphs) graph.Play(); void Update() { for (var bucket = 0; bucket < interval; bucket++) _pendingDeltaTime[bucket] += Time.deltaTime; var scheduled = _frameIndex % interval; _bucketGraphs[scheduled].Evaluate(_pendingDeltaTime[scheduled]); // Only one bucket per frame _pendingDeltaTime[scheduled] = 0f; _frameIndex++; } |
With this method, you can pass the accumulated Δt as is to Evaluate(), so the progress is accurate. In exchange, you hold as many graphs as there are thinning levels, and to change the LOD level dynamically you must move characters between graphs (recreate their outputs).
Measurement: comparison of three implementations
600 characters, Renderers disabled. Mean frame time and the reduction rate relative to updating every frame (5.037 ms).
Table 1.14: Frame time comparison of three thinning implementations (600 characters)
| Implementation | 1/2 thinning | 1/4 thinning |
|---|---|---|
Explicit Animator.Update() call (phase offset) | 4.831 ms (−4.1 %) | 2.578 ms (−48.8 %) |
Animator.enabled toggling | 3.350 ms (−33.5 %) | 1.835 ms (−63.6 %) |
Manual graph per phase (AnimatorControllerPlayable) | 3.082 ms (−38.8 %) | 1.541 ms (−69.4 %) |
The naive implementation is the least worthwhile. The difference is especially large at 1/2 thinning, where −4.1 % became −33.5 % / −38.8 %. The conclusion of the previous section, “2x thinning is eaten up by the loss of parallelization”, does not hold if you change the implementation.
You can confirm that parallelism is preserved with the Profiler markers.
Table 1.15: Per-thread breakdown of three thinning implementations
| Method | Animator.ProcessGraph total across all threads | Of which main thread | Update time on the main thread |
|---|---|---|---|
| Update every frame (600 characters per frame) | 20.104 ms | 1.257 ms | Animators.Update 4.046 ms |
Animator.Update(), 1/4 (150 characters per frame) | 0.278 ms | 0.180 ms | ATB.ManualAnimatorUpdate 2.316 ms |
Animator.enabled, 1/4 (150 characters per frame) | 4.424 ms | 0.288 ms | Animators.Update 1.104 ms + toggling 0.125 ms |
| Manual graph per phase, 1/4 (150 characters per frame) | 4.253 ms | 0.279 ms | ATB.BucketEvaluate 1.278 ms |
In the two new implementations, the amount of work in Animator.ProcessGraph is exactly 1/4 of updating every frame (naturally, since only 150 characters are evaluated per frame), and that work is still spread across the worker threads. In the Animator.Update() version, by contrast, almost nothing is counted in this marker, and the bulk of the work is inside ATB.ManualAnimatorUpdate on the main thread.
Listing the main-thread cost per character makes the difference clear.
- Update every frame: 4.046 ms / 600 characters = 6.7 µs per character
Animator.enabledtoggling, 1/4: 1.229 ms / 150 characters = 8.2 µs per character- Manual graph per phase, 1/4: 1.278 ms / 150 characters = 8.5 µs per character
Animator.Update(), 1/4: 2.316 ms / 150 characters = 15.4 µs per character
In the two new implementations, the cost per character stays almost the same as updating every frame (the difference is the overhead of toggling and calling Evaluate). As a result, the reduction rate approaches the thinning ratio.
We also confirmed that the playback speed is preserved. Measuring the distance per second traveled by the fingertip bone of the last character spawned (the one with the largest phase slot), we get 0.509 m/s for updating every frame, versus 0.496 m/s for Animator.enabled toggling and 0.517 m/s for the manual graph per phase. Within the error from thinning approximating the motion linearly, the speed is unchanged in both.
One note on the distribution: at 1/2 thinning, the manual graph version has a heavier tail, with a p99 of 9.102 ms and a standard deviation of 1.086, than the enabled toggling version (p99 4.100 ms, standard deviation 0.562). At 1/4, conversely, the manual graph version is more stable (standard deviation 0.306 versus 0.340). The behavior changes with the balance between the number of graphs and the number of characters per graph, so if you adopt it, look at p99 as well as the mean.
Which to choose depends on the requirements. If you want to keep using the Animator's state machine and the Inspector workflow as is, toggling Animator.enabled is overwhelmingly easier (it takes a few lines and has almost no effect on existing code). If you need accurate progress or graph-side control such as inserting an Animation Job, use a manual graph per phase. In either case, there is no reason to choose an implementation that calls Animator.Update() yourself.
1.6.8. Conclusions of this chapter
- Design animation LOD as a set of “thinning the update frequency + phase offset”
- Phase offset does not reduce the total load (mean 2.613 vs. 2.578 ms). What it reduces is the variation in frame time (standard deviation 3.863 → 0.185), which is a measure for perceived quality
- Do not choose an implementation that calls
Animator.Update()yourself. Because it evaluates synchronously on the spot, it loses job parallelization, and the main-thread cost per character rises about 2.3 times, from 6.7 to 15.4 µs - Instead, choose every frame which characters take part in Unity's batch update. Either toggle
Animator.enabled(with compensation throughkeepAnimatorStateOnDisable = trueandAnimator.speed), or split manual graphs by phase and attachAnimatorControllerPlayable. The cost is 8.2 to 8.5 µs per character, and parallelization is preserved - Changing the implementation makes even 2x thinning effective: −4.1 % became −33.5 % / −38.8 %. With 4x it is −63.6 % / −69.4 %
- Per-character thinning cannot be expressed with a single consolidated graph. However, “splitting graphs by the number of phases” achieves both parallelization and update frequency control
- Do not judge by the median alone. Look at the mean for the total load, and at p95, p99, and the standard deviation for perceived quality
1.7. Summary
These are the measurement results of each chapter.
Table 1.16: Summary of measurement results by chapter
| Chapter | Measure | Condition | Result |
|---|---|---|---|
| Asset settings | Optimize Game Objects | 600 characters, 1 Renderer | 6.797 → 5.991 ms (−11.9 %) |
| Asset settings | Optimize Hierarchy (runtime) | 600 characters, 1 Renderer | 6.797 → 6.009 ms (−11.6 %) |
| Asset settings | The two methods above | 300 characters, all Renderers | 18.205 → 18.3 to 18.5 ms (no improvement, rendering-bound) |
| Job Thread | Consolidate manual update graphs into one | 600 characters | 8.396 → 4.500 ms (−46.4 %) |
| Animation C# Jobs | Convert Two-Bone IK to an Animation Job | 300 characters, 64 solves | 9.094 → 2.795 ms (−69.3 %) |
| Animation C# Jobs | Additionally compile with Burst | 300 characters, 64 solves | 2.795 → 2.792 ms (no difference in frame time) |
| Animation LOD | 1/4 thinning, explicit Animator.Update() call | 600 characters | Mean 5.037 → 2.578 ms (−48.8 %) |
| Animation LOD | 1/4 thinning, manual graph per phase | 600 characters | Mean 5.037 → 1.541 ms (−69.4 %) |
| Animation LOD | 1/2 thinning, explicit Animator.Update() call | 600 characters | Mean 5.037 → 4.831 ms (−4.1 %) |
| Animation LOD | 1/2 thinning, manual graph per phase | 600 characters | Mean 5.037 → 3.082 ms (−38.8 %) |
1.7.1. Final optimization approach
This is how to proceed with animation optimization for large numbers of characters, based on the measurements in this chapter.
1. Optimize the asset settings
First, set appropriate values for the vertex and bone counts in the model specification itself. Ideally, you first measure benchmarks on the baseline supported devices and establish an appropriate model regulation. Then consider applying Optimize Game Objects on the Unity side. In a 3D title, it is difficult to make major changes to upstream model production late in the project, once mass production is well under way, so it is best done early in the project.
2. Increase the parallelism of processing on the Animation Job Thread
Unity parallelizes the Animator and automatically updated Playable Graphs automatically, but manual updates are parallelized only per graph. When designing character control, keep in mind whether you can make effective use of the Animation Job Thread.
3. Optimize, including applying Burst to Animation Jobs
First move post-processing such as IK from the main thread to an Animation Job.
If further performance is needed, apply a data and processing design that allows SIMD vectorization.
4. Apply application-level techniques such as animation LOD
After exhausting asset, engine setting, and code optimizations, the last resort is not processing the animation in the first place.
This depends on the project requirements, but consider a mechanism that reduces processing while exploring the line that is acceptable for the game experience.
1.8. Footnotes
1.8.1. Unity official documentation
- Playable API
https://docs.unity3d.com/Manual/Playables.html — Building a Playable Graph andDirectorUpdateMode - AnimatorUtility.OptimizeTransformHierarchy
https://docs.unity3d.com/ScriptReference/AnimatorUtility.OptimizeTransformHierarchy.html — Flattening the hierarchy at runtime - Model Import Settings: Rig(Optimize Game Objects)
https://docs.unity3d.com/Manual/FBXImporter-Rig.html - IAnimationJob
https://docs.unity3d.com/ScriptReference/Animations.IAnimationJob.html — Jobs inserted intoAnimationScriptPlayable - AnimationScriptPlayable
https://docs.unity3d.com/ScriptReference/Animations.AnimationScriptPlayable.html - C# Job System
https://docs.unity3d.com/Manual/JobSystem.html — A mechanism for writing parallel processing without going throughAnimationStream
1.8.2. Assets used
- Unity-chan 3D model data
https://unity-chan.com/ — © Unity Technologies Japan/UCL